ReefMonkey13

Advanced Reefer
Location
Queens
Rating - 100%
105   0   0
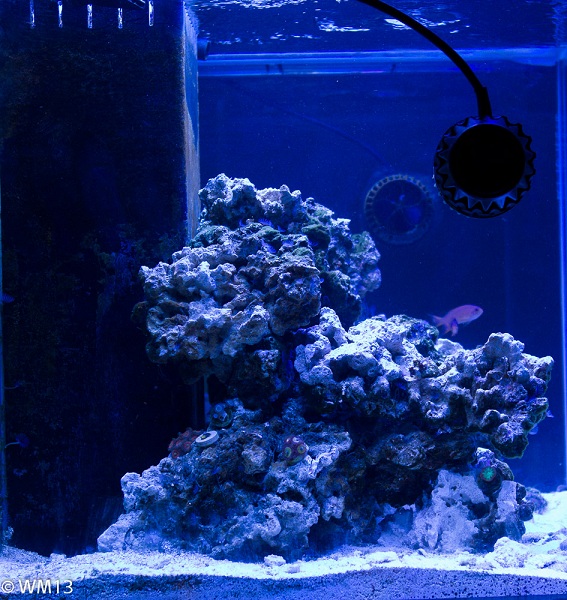
Well after almost a year of keeping my tank bare and fish only, I thought for the new year I will start feeding my reef addiction. Over the past 2-3 weeks I have been doing several (8-9) 10G water changes to get by water parameters within the range of keeping a sustainable reef.

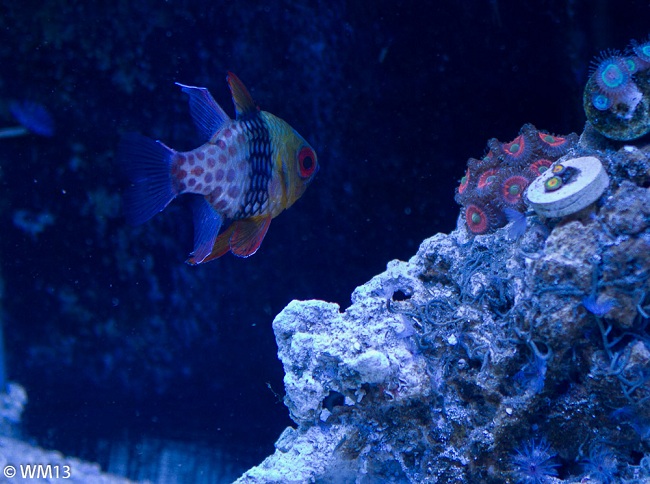
My ultimate goal to keep a colorful SPS dominated mixed reef.

Tank Specs:

  • 75 Gallon - 30"W X 24"D X 24"H
  • DIY Tank Stand and Canopy
  • Lighting: T5 and LED combo (Photo period (1-11pm)
    • ATI Sunpower 6 bulb - 24" fixture (front to back)
      • ATI Blue+ (3-9pm)
      • ATI Purple+ (dusk/dawn) (2-10pm)
      • ATI Blue+ (3-9pm)
      • Geismann Aquablue+ (3-9pm)
      • ATI Blue+ (dusk/dawn) (2-10pm)
      • ATI Blue+ (3-9pm)
      • This gives a kind of 14K look; i might change out some of the bulbs to get a more 20K look (suggestions are welcomed)
    • 2 Vertex Illuminlux LED Strps
      • 50/50 White and Blue (1:30 -10:30pm)
      • All Blue (Blue and Royal blue mix) (1-11pm)
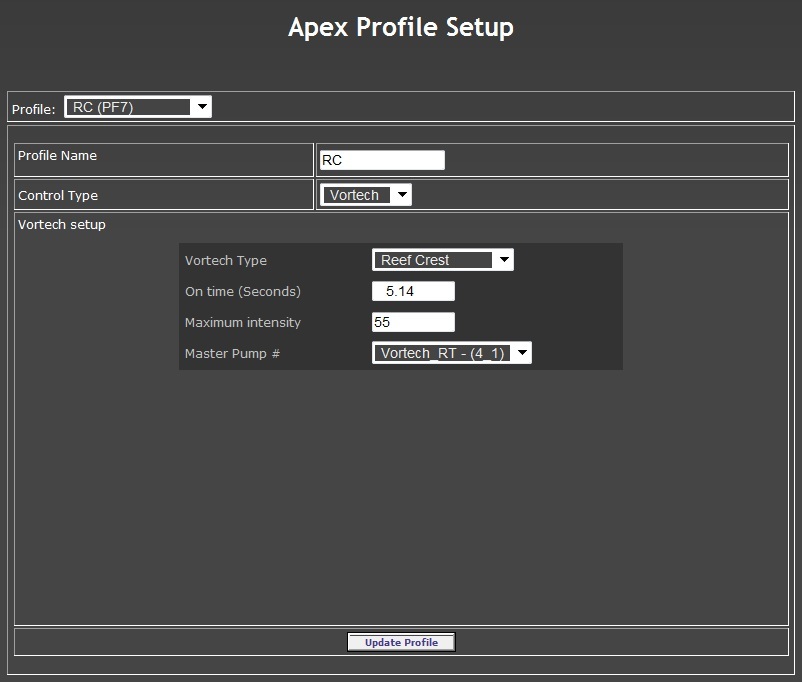
  • Flow: 2 Vortech MP40Wes (Controlled by Apex)
  • Controller:
    • Neptune Apex Aqua Controller
      • WXM to control vortechs
      • Breakout Box for ATO and other controls via float switches
    • DJ Power Strip - 8 plug with individual switches
  • 30 Gallon Sump (DIY) - 30X12
    • Skimmer section 12X12 baffle height 12"
      • SWC 160 Cone
    • Return 9X12
      • Ehiem 1262 Manifold return
        • BRS GFO reactor (feeds fuge area)
        • BRS Carbon reactor (discharges in skimmer section)
      • DIY Cooling fans (Computer case fans 120mm)
    • Fuge 9X12 baffle height of 14"
      • Chaeto
      • Gracilaria
      • Ulva
I think equipment wise I'm OK for now (as you notice i'm kinda an equipment junky). I will be looking at getting a automatic doser in the future but I think since my tank is empty a weekly water change should suffice.
 

Attachments

  • RM13_Tanked_Dec2012-9.jpg
    RM13_Tanked_Dec2012-9.jpg
    93.6 KB · Views: 234
  • RM13_Tanked_Dec2012-10.jpg
    RM13_Tanked_Dec2012-10.jpg
    128.1 KB · Views: 229
  • RM13_Tanked_Dec2012-11.jpg
    RM13_Tanked_Dec2012-11.jpg
    143.8 KB · Views: 227
  • RM13_Tanked_Dec2012-12.jpg
    RM13_Tanked_Dec2012-12.jpg
    142.5 KB · Views: 224
  • RM13_Tanked_Dec2012-13.jpg
    RM13_Tanked_Dec2012-13.jpg
    83.6 KB · Views: 225
  • RM13_Tanked_Dec2012-16.jpg
    RM13_Tanked_Dec2012-16.jpg
    86.9 KB · Views: 229
Last edited:

ReefMonkey13

Advanced Reefer
Location
Queens
Rating - 100%
105   0   0
1st Pic: Side View: I recently re-aquascaped the tank to best accommodate the Vortechs and make them have a more open lay-out for the flow.

2nd Pic: Front View

3rd and 4th Pic: Some fish

  • Hippo Tank (4-5")
  • 3 Lyretail Anthias
  • 1 False Perc
  • 1 PJ Cardinal
Will look to add a few more fish maybe a couple pairs of clowns and some wrasse.

Other Pics: Some of the Zoos i have attained in the past month or so. They seem to be doing OK.
 

Attachments

  • RM13_Tanked_Dec2012-1.jpg
    RM13_Tanked_Dec2012-1.jpg
    141.7 KB · Views: 222
  • RM13_Tanked_Dec2012-7.jpg
    RM13_Tanked_Dec2012-7.jpg
    165 KB · Views: 223
  • RM13_Tanked_Dec2012-18.jpg
    RM13_Tanked_Dec2012-18.jpg
    110.5 KB · Views: 220
  • RM13_Tanked_Dec2012-19.jpg
    RM13_Tanked_Dec2012-19.jpg
    74.7 KB · Views: 219
  • RM13_Tanked_Dec2012-2.jpg
    RM13_Tanked_Dec2012-2.jpg
    117.4 KB · Views: 219
  • RM13_Tanked_Dec2012-4.jpg
    RM13_Tanked_Dec2012-4.jpg
    101.7 KB · Views: 219
  • RM13_Tanked_Dec2012-5.jpg
    RM13_Tanked_Dec2012-5.jpg
    68.5 KB · Views: 218
Last edited:

ReefMonkey13

Advanced Reefer
Location
Queens
Rating - 100%
105   0   0
Basic Apex Programs

Here are some of the programs/settings I have configured for my Apex. I will try to describe each line so that you can understand the logic behind the settings.

Most of these has been borrowed from others that have posted online but I know that those who are new apex users will find a verbose description helpful.

For advance users, feel free to suggest enhancements or tweaks to my settings. I'm always eager to learn more.

Feed Settings: From your apex status page go to Configuration ==> Misc Setup (See first Image). You can set these to any time frame you like.

FeedA : 15 minutes [activate when feeding fish]
FeedB: 30 minutes [activated when feeding corals]
FeedC: 60 minutes [for quick water change]
FeedD: 90 minute [for heavy maintenance and water change]

Heater
:

Fallback OFF [If the EB8 (power strip) loses connection to head unit this switch should be OFF]
If Temp < 77.5 Then ON [If the temp is lower than 77.5 turn ON]
If Temp > 78.0 Then OFF [If the temp is greater than 78.0 turn OFF]
Defer 005:00 Then ON [wait 5 minutes after the ON condition is satisfied before turning ON]
Defer 002:00 Then OFF [wait 5 minutes after the OFF condition is satisfied before turning OFF]
If FeedC 005 Then OFF [If feed cycle C is activated turn OFF]
If FeedD 005 Then OFF [If feed cycle D is activated turn OFF]

Fan:

Fallback OFF
[If the EB8 (power strip) loses connection to head unit this switch should be OFF]
If Temp > 78.5 Then ON [If the temp is greater than 78.5 turn ON]
If Temp < 78.0 Then OFF [If the temp is lower than 78.0 turn OFF]
Defer 002:00 Then ON [wait 2 minutes after the ON condition is satisfied before turning ON]
Defer 005:00 Then OFF [wait 5 minutes after the OFF condition is satisfied before turning OFF]
If FeedC 005 Then OFF [If feed cycle C is activated turn OFF]
If FeedD 005 Then OFF [If feed cycle D is activated turn OFF]

Fuge Light: My other light settings are similarly configured.

Fallback OFF [If the EB8 (power strip) loses connection to head unit this switch should be OFF]
Set OFF [this is initialize the state of the outlet, in this case OFF]
If Time 23:00 to 09:00 Then ON [turns ON at 11pm to 9am]
If Temp > 84.0 Then OFF [If Temp is greater that 84 degrees then OFF]
Min Time 030:00 Then OFF *
If FeedC 005 Then ON [If feed cycle C is activated turn ON]
If FeedD 005 Then ON [If feed cycle D is activated turn ON]

*
[This statement prevents the outlet from flopping on to off. What this statement does is, if the outlet is switched off based on the previous line condition, it requires a 30 minute lag time for the outlet automatically reactivate.]


Attachments

  • Apex_Misc.jpg
    Apex_Misc.jpg
    56 KB · Views: 215
Last edited:

ReefMonkey13

Advanced Reefer
Location
Queens
Rating - 100%
105   0   0
Apex Break Out Box Programs

Break Out Box programs:
Here are the switch assignments:
Switch1 = Sump Water Level Low
Switch2 = Sump Water Level High (float switch is wired opposite from others)
Switch3 = ATO Reservoir Low
Switch4- Switch6 is unused at this time. Was thinking of using for the following:

  • On a DIY skimmate container, notify and shut off skimmer when full.
  • Water leak detector to initialize alarm
  • Maybe a door switch alarm to scare the kids if they try to get to the sump (lol)
Think about the switches like a circle wire. When the circle is OPEN (like a C) the current can NOT circulate through the wire. When the circle is CLOSED (like an O) the current can flow through the entire circle.

Alarm:

Set OFF
If Switch2 OPEN Then ON [If Switch2 is OPEN (meaning the circuit is broken) then activate the alarm]
If Switch3 CLOSED Then ON [If Switch3 is CLOSED (circuit is completed) then activate the alarm]
If FeedC 000 Then OFF [If feed cycle C is activated turn OFF]
If FeedD 000 Then OFF [If feed cycle D is activated turn OFF]

ATO: Set this on the outlet that controls your ATO pump. I am using an TOMS Aqualifter as my ATO pump. This pump consumes very little power so I have it set it up to be on either Outlet 4 or 8 of the EB8. Those 2 outlets handles the low energy devices the best.

Fallback OFF [If the EB8 (power strip) loses connection to head unit this switch should be OFF]
Set OFF [this is initialize the state of the outlet to be OFF]
If Switch1 CLOSED Then ON [If Switch1 is CLOSED (circuit is completed) then activate the pump]
If Switch1 OPEN Then OFF [If Switch1 is OPEN then turn the pump OFF]
If Switch2 OPEN Then OFF
[If Switch3 is OPEN then turn the pump OFF]
Defer 000:30 Then ON [wait 30 seconds after the ON condition is satisfied before turning ON]*
Defer 000:30 Then OFF [wait 30 seconds after the OFF condition is satisfied before turning OFF]*
If FeedC 005 Then OFF
[If feed cycle C is activated turn OFF and stay off for another 5 minutes after the feed cycle is completed]
If FeedD 005 Then OFF [If feed cycle D is activated turn OFF and stay off for another 5 minutes after the feed cycle is completed]

* This statement prevents the ATO pump to go on and off due to some water sloshing in the sump.
 

ReefMonkey13

Advanced Reefer
Location
Queens
Rating - 100%
105   0   0
WXM Program

Here are some of the settings I'm using to control my Vortechs via my Apex controller.

I love this add on. It really allows you take the full capability of the Vortech and mix & match modes as you like. You can also dictate how powerful the Vortechs should be without having to look at the Led displays.

There are generally 2 steps you need to take in terms of configuring the WXM add on control the vortech pumps.

  1. Define the Vortech mode profiles.
  2. Assign the profiles to the linked Vortech Pump (please refer to the instruction manual to link your pump to the WXM module)
Once you connect the WXM module to your Apex you will be able to see "Vortech" as a Control type on the Apex Profile Setup Screen. Now you will need to create an Apex profile for EACH of the modes you are using.

On the attached image I created a profile called "RC" (for Reef Crest).

  • Selected "Control Type" to be VORTECH.
  • Vortech Type list out all the modes associated with your vortech. I have the ES version so those modes are also included on the dropdown. For this example I selected "Reef Crest".
  • On Time - KEPT at DEFAULT (5.14) - I'm not 100% user but I think you will only use this if you are using the pulse modes.
  • Maximum Intensity: I set my to 55% since my tank is fairly short (30 inches).
  • Master Pump # - I just left it to the first Vortech. Like the "On Time" setting I don't think this is applicable to all modes. I only changed this for the Sync and Anti-Sync profiles I created.
Here are the modes I created

  1. RC - for Reef Crest Mode
  2. TS - Tidal Swell
  3. LGN - Lagoon
  4. Nut - Nutrition Export
  5. Vor_Nite - Night mode which is Lagoon at 30% intensity
  6. Vor_Feed - Reef Crest at 25% intensity
  7. Vor_Back - Back Vortech Mode
  8. Sync_RT - Sync Mode to the Right Vortech
  9. Sync_LT - Sync Mode to the Left Vortech
  10. AntiS_RT - Anti-Sync Mode to the Right Vortech
  11. AntiS_LT - Anti-Sync Mode to the Left Vortech
Here are how the Virtual Vortech Outlets configured:

Right Vortech:
Fallback RC
Set RC
If Time 00:00 to 01:59 Then Nut
If Time 02:00 to 06:59 Then Vor_Nite
If Time 07:00 to 10:59 Then TS
If Time 11:00 to 11:59 Then Vor_Back
If Time 12:00 to 13:59 Then LGN
If Time 14:00 to 17:59 Then RC
If Time 18:00 to 19:59 Then AntiS_LT
If Time 20:00 to 21:59 Then AntiS_LT
If Time 22:00 to 23:59 Then AntiS_LT
If FeedA 000 Then Vor_Feed
If FeedB 000 Then OFF
If FeedC 000 Then Vor_Feed
If FeedD 000 Then Vor_Feed

Left Vortech:
Fallback RC
Set AntiS_RT
If Time 00:00 to 00:59 Then Sync_RT
If Time 01:00 to 01:59 Then AntiS_RT
If Time 02:00 to 04:59 Then AntiS_RT
If Time 05:00 to 06:59 Then Sync_RT
If Time 07:00 to 09:59 Then AntiS_RT
If Time 10:00 to 10:59 Then Sync_RT
If Time 11:00 to 11:59 Then Sync_RT
If Time 12:00 to 13:59 Then AntiS_RT
If Time 14:00 to 15:59 Then AntiS_RT
If Time 16:00 to 17:59 Then Sync_RT
If Time 18:00 to 19:59 Then RC
If Time 20:00 to 21:59 Then LGN
If Time 22:00 to 23:59 Then TS
If FeedA 000 Then Vor_Feed
If FeedB 000 Then OFF
If FeedC 000 Then Vor_Feed
If FeedD 000 Then Vor_Feed

:Yikes: . . .:goldfish2
 

Attachments

  • Apex_Profile.jpg
    Apex_Profile.jpg
    43.3 KB · Views: 185

Sponsor Reefs

We're a FREE website, and we exist because of hobbyists like YOU who help us run this community.

Click here to sponsor $10:


Top