• Why not take a moment to introduce yourself to our members?

brandon4291

Advanced Reefer
Rating - 0%
0   0   0
Wanted to review some benefits of a baffle refugium in this thread.

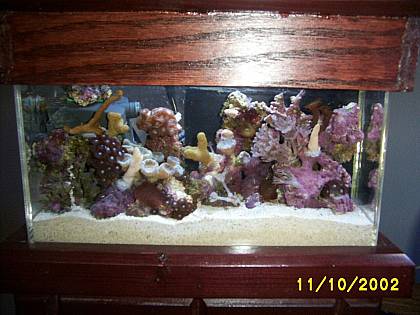
I tried this idea because there was a need for constant oxygen production within a completely sealed environment--its the only way you can pico reef without maintenance hassles. The pic featured later on, the one of the condensation, is what it looks like after running sealed--oxygen and carbon dioxide are not exchanged with the external air in this design. This seems to be the right proportion of macro algae for the given bioload.

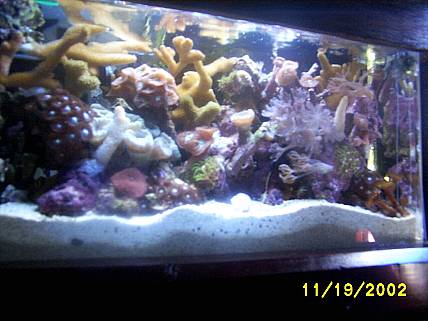
I currently have (all very very small frags) Blastomussa, GSP x2 var., three red/blue mushrooms, yellow Montipora x2<--- *my fav
pink and brown Montipora, ten small heads of Caulastrea, three var. Zooanthids, pulsing Xenia, Anthelia and Clavularia. Of course the specimens will be fragged/relocated as needed-- and its not as often as one might suspect.

For the first time, the sealed reef design was 100% effective and easy to achieve with some Home Depot weatherstripping--there was a small erasable marker line where the water level was, and it never dropped. I do dose it every four or so days through a corked hole in the back. It needs 10-15 drops of carbonate every four days or so and the pH is very stable from day to night.
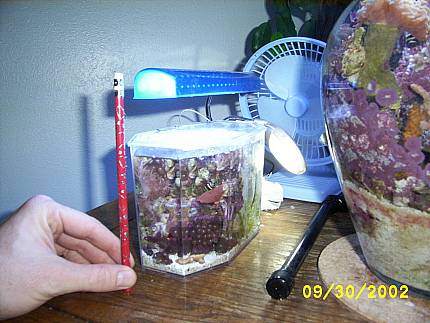
Oxygen production had to be constant throughout a given 24 hour period. In a three-quarter gallon reef there is not much water column left over after you plumb it, stock it with LR and specimens and finally add sand. That actual water column is somewhere around 25-30 ounces I would guess.
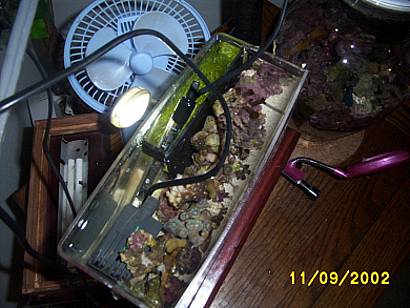
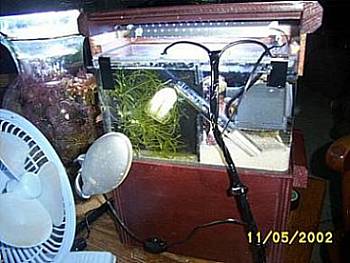
Plumbing these tiny tanks is not fun, and prone to leaks. They are harder to seal when you are working with two different tanks...so the refugium had to be internal. It was then easy to see that you could make a very thin refugium, but have much surface area for light penetrance if you light it from the side. **Azoo palm light-miniature 7 watt power compact 7700 kelvin rating
Salt creep does not happen if you don't give the capillary action a chance to start: the water line is 1/2 inch below the seal and no caulerpa fronds are allowed to touch the seal.
heres the pics:

Brandon M.
 

Attachments

  • baffleproportions.2.jpg
    baffleproportions.2.jpg
    26.4 KB · Views: 1,570

brandon4291

Advanced Reefer
Rating - 0%
0   0   0
this is the baffle refugium from behind, its about 25 percent of the internal space of the tank.
 

Attachments

  • rearmini75.2.jpg
    rearmini75.2.jpg
    21.5 KB · Views: 1,573

brandon4291

Advanced Reefer
Rating - 0%
0   0   0
this is the condensation check as the unit runs completely sealed, removing the threat of salinity fluctuations in very small reefs. Once you can stabilize the salinity and oxygen trends of a given tank you can break many rules successfully.
 

brandon4291

Advanced Reefer
Rating - 0%
0   0   0
positioning the powerhead flow: about 90 percent of it aims into the water column and 10 percent of the outflow tube aims into the refugium. No need to carefully direct the water...its just positioned so most of it does not go into the refugium.

The baffle refugium was also designed to handle a miracle mud (or equivalent) macro algae mud bed at 4x the depth of the live sand bed. the mud can be filled up to the point where the glass heater escapes the baffle refugium. that MM might be too rich for the tiny water column, and I sure dont want a micro algae outbreak.
 

brandon4291

Advanced Reefer
Rating - 0%
0   0   0
a plastic sheet from Michaels crafts, one used to hold an artists easel, was chosen for the baffle refugium sacrifice because it was opaque and easily cut with a jig saw.
 

Attachments

  • crateplastic.2.jpg
    crateplastic.2.jpg
    9 KB · Views: 1,548

brandon4291

Advanced Reefer
Rating - 0%
0   0   0
this is the circulation check and initial powerhead adjustments to get it just right. In this picture, the refugium and tank are complete, it just needs to be filled with saltwater and stocked.
 

brandon4291

Advanced Reefer
Rating - 0%
0   0   0
now the canopy has been stained to match the stand, and the complete system works together to make a 30 oz pico reef as realistic and as stable as a conventional reef.
 

Attachments

  • mreef75close11-11.2.jpg
    mreef75close11-11.2.jpg
    26.7 KB · Views: 1,544

brandon4291

Advanced Reefer
Rating - 0%
0   0   0
This shows the scaling of the reef, a picture made before I was done retrofitting the miniature canopy for a single 13watt pc combo bulb.
 

Attachments

  • tbm75.2.jpg
    tbm75.2.jpg
    31.6 KB · Views: 1,540
A

Anonymous

Guest
Rating - 0%
0   0   0
Hey Brandon...

One question. I'm thinking about building a 2.5 gal somewhat like yours later this week. In your sump section, do you have slots or something to allow water to easily flow back into the main tank area, or is the top of the 'sump' below the water line?

Thx!
 

brandon4291

Advanced Reefer
Rating - 0%
0   0   0
I did dremel a couple outflow holes on the other side of the refugium, so a little would escape from the other side (flowthrough)
The system is completely stocked with 6 pieces of orange montipora added this weekend. also found ten individual blastomussa heads and added them to the ten or so already in there. My goal here is to mimic the scaling found in 100+gallon tanks (LR/LS/watercolumn/circulation proportions) but in a tank as tall as my index finger--they are somehwhat easier to keep and alot cheaper. You can certainly bet when I get the $$ for a 150gallon that will be my new fixation--but until then!
much of the incoming water just swirls around and comes back out the entrance port. I have left the baffle refugium empty of mud since I dont have any yet for a deep mud bed trial, and it seems to collect detritus nicely. perhaps it will better function as a detritus trap so I dont have to go poking around the rocks to get it out--the current is very very strong in there. notice the pulsing xenia aiming sideways, its so rough it can't stand up straight.
shalegac!
 

Attachments

  • fullystockedmini.75.2.jpg
    fullystockedmini.75.2.jpg
    25 KB · Views: 1,475

bdelaney

Experienced Reefer
Rating - 0%
0   0   0
Sharkky":3bqaihrb said:
Hey Brandon...

One question. I'm thinking about building a 2.5 gal somewhat like yours later this week. In your sump section, do you have slots or something to allow water to easily flow back into the main tank area, or is the top of the 'sump' below the water line?

Thx!

I recently built a 2.5 gallon setup with a built-in sump in the back. I siliconed an acrylic divider across the back of the tank. I slotted the top of the acrylic with a dremel to mimic an overflow. There is a divider that splits the sump in half, and I have macro-algae growing one half of the sump. The other side houses a micro-jet pump and the heater. The pump is plumbed through the acrylic via a small hole and an elbow fitting. The only thing I would do differently would be to use a piece of colored or opaque acrylic so that I could light the macro-algae on an alternate or 24-hour lighting cycle without lighting the main part of the tank.

The top of the tank is very well sealed by a piece of tight fitting acrylic with two small slots cut for power cords. Its currently lit by an 18 watt JBJ PC light (10000K/actinic combo bulb). It's been running now for a few weeks with some liverock, a piece of xenia, and a mushroom or two. I'll see how it stabilizes before I stock it any further.

I have some pictures, but they are not developed yet. I can post them later in the week if anyone is interested.

Thanks to Brandon for inspiring me to build this tank.
 

brandon4291

Advanced Reefer
Rating - 0%
0   0   0
Sounds like a great tank to have! its definately a pico and at that size you can hold a small fish with no trouble. would you ever use miracle mud to see what effect that had? I havent tried that yet, and possibly it might ease some dosing requirements. Today I took off the lid and went into the glass cutter's shop to see if he will shape me a similar piece of glass. Im having trouble with acrylic wanting to warp even with a fan... can't wait to see your pics B great job

b429
 
A

Anonymous

Guest
Rating - 0%
0   0   0
brandon429":z73zaphn said:
would you ever use miracle mud to see what effect that had?
b429

Well, I cut out and siliconed in the sump section of my 2.5 last night. I think I'm going to scoop a cup of the miracle mud from my 75 gal's sump to kick-start the little beast, probably tonight or this weekend. I'll snap some pics when I do. :)

-John
 

bdelaney

Experienced Reefer
Rating - 0%
0   0   0
No, I never used miracle mud. I worry that the nutrient content might be too much for a tank this size. I'd be interested to hear the results from Sharkky's experiment.

I suspected that the acrylic might warp on me. It looks like its already started. Let us know how that glass top turns out.
 

brandon4291

Advanced Reefer
Rating - 0%
0   0   0
I can't wait to hear about the chemical and physical shifts you observe in your new pico reefs!!! I am always interested to hear what dosing regimen works for you and your particular system. pics asap please :)
BDelaney and Sharkky, one thing I would be very intrigued to see is some basic line graphs or data plots on pH, alkalinity and nitrate trends in your pico reefs. I made the mistake of not logging them for much of the reefbowl's early months, and there is no better way to uncover the mystery of chemical stability in a pico reef than with that approach.
 

brandon4291

Advanced Reefer
Rating - 0%
0   0   0
Having a pool of observations to draw from is great when working with pico reefs. I also can't wait to hear what mmud does to a pico reef--amounts may have to be adjusted to account for nutrients in the mud I agree BDelaney. It may help though, and anything that reduces maintenance in your coral garden is right up my alley Sharkky so lets hope it works out.

Heres another toss-in to the pool, its taken a few months to get it right:

One brute I was battling against for some time is salt creep in sealed systems. Even with a taped on lid, it found its way through in a few places. If you give salt a place to start capillary action (water line too high towards the seal or a caulerpa frond touching the seal) and air movement outside the tank (via light cooling fans) to dry the edges of it, your salinity will actually drop drastically as the water line lowers (reverse of the usual reef trend of a spiking pH with a drop in the water line)
it became apparent that a section of caulerpa growing up and touching the seal of the lid acts like a ladder for the salt to creep on...salt will find its way out almost any seal if you give it a chance.
also, this reef demonstrated that the water line can't be too high on the tank, at least a full half-inch below the lid. Saltwater has notable surface tension, and tends to curve upwards (roughly 1/2 inch if not too agitated)at the edges of the water line. So, the corners and edges of the tank will be wicking points if you dont keep the water lower than the surface area allows for a curve... a bit wordy I know but it took me two months to figure that out.

some is getting through on the Mini.75, but I think I see now how to fix it. Its only in the rear above the baffle refugium where the fan has been blowing upwards, so I am about to go to RadioSlack and drop fifty dollars on a powersupply and three miniature fans. They will be glued under the canopy, and aim only towards the light. They will be up above the lid/tank junction hence they will not be blowing across it, feeding the draw. HTH me


B

this was the first sealed system I built, the femtoreef (Shane!)
 

Attachments

  • nexttoapencilreef.1211.jpg
    nexttoapencilreef.1211.jpg
    29.8 KB · Views: 1,409

bdelaney

Experienced Reefer
Rating - 0%
0   0   0
I've been logging my test readings for my 29g, but I haven't started this for my 2.5 yet. I'll pick up a little notepad and start on this. I agree that the readings would be interesting.

I thought about the salt creep problem, and one mistake that I made was not making the slots I cut in the acrylic overflow deep enough. The water on the tank side is too close to the top cover. However, on the sump side, I easily can easily leave an inch between the top of the water and the acyrlic cover. This extra space should eliminate any caulerpa leaves from touching the cover and causing salt creep. I don't use fans because I use a clamp-on lamp, so heat is not that much of an issue.

Have you had any problems with mineral deposits on the underside of the cover? I know with my old fish only setup, the glass needed to be cleaned with vinegar from time to time to remove the mineral deposits that accumulated on the glass covers. These mineral deposits greatly reduced light penetration...bad for a reef...doesn't matter for a fish only.

What are your thoughts on lighting for the macro-algae? Do you light it 24 hours a day or on an alternate cycle? I'm currently only lighting it with the main tank, but I think in the future I might get one of those palm lights and use it to light the macro-algae at night.
 
A

Anonymous

Guest
Rating - 0%
0   0   0
One thing I should note and hopefully get a couple of opinions on before I start up the 2.5 with miracle mud is that the 75 gal that will be donating the mud has had one b!tch of a time growing any caulerpa (or any algae at all for that matter). I've 'seeded' the sump with caulerpa 3 or 4 times and each time it just dies off over the course of a couple weeks. I just added a fresh batch of feather caulerpa and the flattened grape caulerpa (sorry, the cold meds I'm on are making me forget the scientific names), so we'll see. I've tried everything--dosing with iron supplements seems to have no effect, increasing nutrient load (via heavy feeding) only seems to end up increasing nitrates (which you would think would thereby stimulate the caulerpa growth).

In fact, I can grow almost no algae at all. It's a 75 gallon main tank with a pair of maroon clowns, a lineatus tang, and a coral beauty angel, and I only have to wipe down the front glass every other week or so. I used to have sugar-sand in there, but the female clown kept fanning it all over, so no good denitrification beds ever developed (which I think was a big part of the problem), so about 3 weeks ago I pulled all the rock, dug out about 7/8 of the sand bed, and replaced with 80lbs of a heavier grade aragonite. Tank seems a lot healthier so far, and the caulerpa that I've started in the sump looks like it's doing okay after a week or so. The sump does have a good population of bristleworms, copepods, amphipods, and limpet-type molluscs.

So anyway, long story short, I don't know how well the MM will work in this small tank...we'll see! :)
 

Sponsor Reefs

We're a FREE website, and we exist because of hobbyists like YOU who help us run this community.

Click here to sponsor $10:


Top