• Why not take a moment to introduce yourself to our members?

A

Anonymous

Guest
knucklehead":2dhk0y5p said:
Guy":2dhk0y5p said:
The design SFSU posted looks a whole lot less complicated and seems to me that it would work better as well with no detritus buildup at the intake.


I think if I ever go Bare bottomed I will redo this knuckleflow, but I have a ton of sand in there, I have to have it offset so I can reach the drain (I don't want the overflow over on the side) and I want to be able to cut the slots deeper later.

I have all the divider pieces put together, tomorrow I am going to put the front and back on and attach a plumbing part.

Should be in the tank by Saturday...

But it wouldn't go over the side and it would be adjustable (height from bottom) and mush easier to access. The plumbing would use the exact same bulkhead that you're current design would use.
 
A

Anonymous

Guest
knucklehead":1eggitud said:
That DP would stand for Double Post you perv's...

<sump>
I dunno... you're talking about it going into the bottom
</sump>
 
A

Anonymous

Guest
Guy":262l4moo said:
knucklehead":262l4moo said:
Guy":262l4moo said:
The design SFSU posted looks a whole lot less complicated and seems to me that it would work better as well with no detritus buildup at the intake.


I think if I ever go Bare bottomed I will redo this knuckleflow, but I have a ton of sand in there, I have to have it offset so I can reach the drain (I don't want the overflow over on the side) and I want to be able to cut the slots deeper later.

I have all the divider pieces put together, tomorrow I am going to put the front and back on and attach a plumbing part.

Should be in the tank by Saturday...

But it wouldn't go over the side and it would be adjustable (height from bottom) and mush easier to access. The plumbing would use the exact same bulkhead that you're current design would use.


I said over on the side, not over the side...

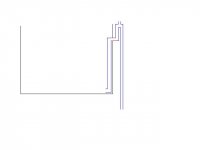
I took another look at the one that stfu drew and then I drew one like his myself.

Is this the idea?
 

Attachments

  • stfu.JPG
    stfu.JPG
    5.3 KB · Views: 1,547
A

Anonymous

Guest
Yep. Look for a heater guard to cover the intake at the bottom so snails & fish don't get stuck. Tronic makes a good black plastic guard.
 
A

Anonymous

Guest
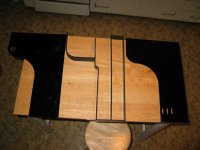
Here are the three pieces ready to put together except for modifying a pvc 90 degree service elbow so it will fit in between the two sides.
 

Attachments

  • 163_6388.JPG
    163_6388.JPG
    53.4 KB · Views: 1,538
A

Anonymous

Guest
knucklehead":15rltdra said:
I took another look at the one that stfu drew and then I drew one like his myself.

Is this the idea?

yup same idea as mine STFU-LOW device ;) just where it's drilled on the side of the tank differs slightly.
 
A

Anonymous

Guest
Does anyone know if I can weld PVC to acrylic with weldon # 4???


I did a destruction test by welding a piece of 1.5 inch pvc to a scrap of acrylic and it held just as well as the acrylic I welded.

Both failed the destruction test, but it was a destruction test and I only let it set for 2 hours before tearing it apart.


So, any problems with that?

Today is the last day of construction on the knuckleflow, it should be finished tonight....
 
A

Anonymous

Guest
I'm unsure if weldon will attach to PVC, I don't think idea is that you chemically break down the acrylic so that when you have two pieces they remerge and you get a nice seam, problem with pvc is its chemically different so might not recombine in a nice way to give a good strong bond.

I would personally go with superglue to lock the two pieces and a bead of silicone just for good measure.
 
A

Anonymous

Guest
The weldon seems to have held the pvc in place, I will goopy it really good just to be sure....


Another question, Is it possible to make a sort of thickened goop by dissolving shavings into the weldon? I have some chips I want to fill....
 
A

Anonymous

Guest
Weld-on #4 will not permanantly bond PVC to Acrylic. In fact only Weld on #40 will do so. It's a two parter that's messy. I have a gallon of it, lol. (long story why I bought a whole gallon when all I needed was about a teaspoon).

Looks like pretty good handy work you got there so far Bryan.

Louey
 
A

Anonymous

Guest
How bout if I silicone the crap out of it?


The only Pvc piece is the one that connects this thing to the bulkhead fitting.

I can thread the other piece into the acrylic, I am sure that will work...
 
A

Anonymous

Guest
Silicone will not make a permenant bond. Only Weldon #40.

Having said that, people use silicone to glue glass to acrylic all the time. I made a overflow for my old 20G refugium that way. Later I learned that it wasn't proper to do so. The thing never leaked in the 4 years I used it. I do sleep better now that that thing is out of the house.

Louey
 
A

Anonymous

Guest
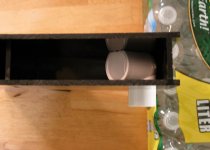
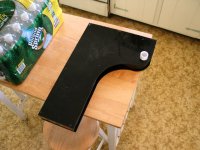
Here is where I am so far, I just tested the overflow portion and it leaks.....


That is bad because it has to be watertight in order for my tank not to drain.

So, I guess I am going to try making some thicker stuff out of shavings and weldon #4

The PVC piece you can see in there I chucked up in my lathe and cut the top off so that it would fit in between the front and back. So, I am not worried about it falling out or anything like that, its not like it can actually go anywhere if it comes loose, the problem would be if it comes loose it will leak a bit and that could cause a flood as the tank is not supposed to drain down to that level.

So, I am about to test it out in the tank, if I my whole theory doesn't work then what is the point of continuing on?

So, off to make some toast and then get the buckets....
 

Attachments

  • knuckleflow2.jpg
    knuckleflow2.jpg
    39 KB · Views: 1,483
  • knuckleflow3.jpg
    knuckleflow3.jpg
    74.1 KB · Views: 1,479
A

Anonymous

Guest
Well, it failed the first test.

there were not enough slots in the bottom to allow enough flow. I have modified it and while I was finishing it I added some other features for my closed loop. Its currently drying, should be done late late late tonight...
 
A

Anonymous

Guest
I think its dry enough to install don't you?

I don't want to be up all night....


By the way, you won't see pics tonight, installing it makes a cloud in my tank.
 
A

Anonymous

Guest
Well, its running, but I still need to cut the one divider down lower, the level in the main tank is too high.

Fun Fun Fun
 
A

Anonymous

Guest
You are supposed to let weldon #4 dry for 24 hours, lol.

I guess patience isn't your virtue, huh Bryan :P

So is it working well now?

Louey
 
A

Anonymous

Guest
:lol:

what is Patience?

I did learn how to make a thickened goop out of weldon #4 and acrylic shavings today. I drilled a 1 1/8" hole in the top of this thing, cut threads in the acrylic with a 1" Pipe tap and threaded a pipe to slip pvc adaptor in there with tons of that thickened goop all over it.

Its holding :D


The whole dang thing is up and running great, its a bit noisy though, my last setup was perfectly silent. I can do things about that though, should be no problemo....
 

Sponsor Reefs

We're a FREE website, and we exist because of hobbyists like YOU who help us run this community.

Click here to sponsor $10:


Top