thirty5

A Little Annoyed!
Rating - 96.6%
84   3   0
no sure how old those pics are. But i was looking at your stand. I would put some sort of support to hold the legs more stable vertically. Tie them together some way just to be sure that for some reason you cant move them. I know that the weight of the water will hold them in place. but i would still do something just to make sure that it does not settle for some reason, then the weight of the tank could make it more unstable.
 

meschaefer

One to Ignore
Location
Astoria
Rating - 100%
30   0   0
Actually she is very small, at least the smallest cat I have every had and my family growing up always had at least two. I forget how much she weighs (my wife takes the cat to the vet, I take the dog).
 

meschaefer

One to Ignore
Location
Astoria
Rating - 100%
30   0   0
no sure how old those pics are. But i was looking at your stand. I would put some sort of support to hold the legs more stable vertically. Tie them together some way just to be sure that for some reason you cant move them. I know that the weight of the water will hold them in place. but i would still do something just to make sure that it does not settle for some reason, then the weight of the tank could make it more unstable.


Stands not done. There are a few support pieces that need to be put into place before I add water. You can see in one of the pics that the center leg is not painted, that one will be removable in case I need to get the sump out. There are diagonal supports for the legs as well, that I just didn't have ready yet.
 
Last edited:

meschaefer

One to Ignore
Location
Astoria
Rating - 100%
30   0   0
Getting the tank in place has put some wind in my sails. I spent the better part of my evening organizing and gowing though my equipment. The RO/DI is in place, but I need a visit to HD before it can start filling my tank. Tomorrow I will stop ny the glass place near me to pick up glass for baffles. I orderd silcone, which came the other day and I am still awaiting dimond hole saws to cut the holes for the bulkheads. They should come tomorrow, I woud hope. (I ordered them the beggining of last week)

I just put in an order with Savko. After an hour of drawing out my plumbing (in mind numbing detail), it took me another half hour before I finished entering in my order. The final order had 57 individual items and came to $180.49 and that is before shipping. I won't get a shipping quote until the pack it. That's alot of PVC fittings and stuff.
 

meschaefer

One to Ignore
Location
Astoria
Rating - 100%
30   0   0
Good luck Matt. It's all coming together great. Funny how everyone forgets how expensive the plumbing is. I'd say it's the most forgotten 'large' expense. Surprises most people.

swimmer


Before starting this project, I laid out a budget and figured that the plumbing was going to cost me $200. Not bad considering that it was just a guess. To top it off, although I laid out the whole thing before hand I won't be 100% convinced it will all fit together until I have it in front of me.

I don't have a scanner at home, when I get into work I will scan my plumbing "schematic".
 

meschaefer

One to Ignore
Location
Astoria
Rating - 100%
30   0   0
Here is the plumbing diagram I drew out so I could figure out what I needed to oder. The second pic is a diagram I previously posted in order to show the general lay out of the plumbing, it may help decipher the first pic. Remember nothing in either one of these diagrams is to scale, or even consistent from one peice to the next. In the upper left hand corner are the durso stand pipes, and the piping running from the overflow is in the upper right hand corner. The plumbing running from the sump, to the sequence dart, and then the plumbing manifold is in the lower left hand corner.

Any thoughts would be appreciated.


plumbing2.jpg


Plumbing.jpg
 

meschaefer

One to Ignore
Location
Astoria
Rating - 100%
30   0   0
ooh...the small annoyances of life.

I picked up the three glass panes to make baffles for my sump this morning. I brought them home and fit test them, and it turns out that two of the baffles are a tad bit long, the third is just a bit shorter than the other two and fits into place. I measure them and the two that are two long are 1/8 bigger than I asked for. So I bring them back to my glass guy who remeasures them, and they are dead on. Either my ruler or his, has a 1/8 margin of error. Either way, the glass is to big so he cuts them down and regrinds the edges for me. He doesn't want to take any extra money, but I insist that I give him a few dollars more for his work.

I then check my e-mail and my Savko order will be here tomorrow. Unfortunately, they where out of stock on the 1" and 1.5" unions. They will be shipped separately, and I am not sure when they will arrive. The good news is that those pieces are not over important when it comes to getting everything set up. they can be the last thing done, and if need be the whole system could be up and running without them. They can be easily inserted into the system afterwards.
 

meschaefer

One to Ignore
Location
Astoria
Rating - 100%
30   0   0
It was a big day for deliveries. Although I was out of my office all day, the wireless Vortech I ordered as allegedly delivered and signed for by the receptionist. It kind of makes me wish I had went in, but it will be waiting for me tomorrow and there is nothing I can do with it anyway. The other delivery was my order from Savko. As I mentioned earlier, the unions I need where out of stock and they will be delivered seperately. The first pic is the box right after I opened it.

plumbingbox.jpg


I took everything out and laid it out on the floor in the general order that they need to be put together. By doing this I figured out that I screwed up my order a bit. Nothing major, and nothing that can't be easily picked up at home depot. That's what I get for placing my order late at night when I was a bit weary. The other problem I have is that when Savko shows you what you ordered to confirm, the site shows you a list of their product numbers and how many you ordered. Although I tried to go through it, I obviously couldn't handle the situation and as a result missed a few pieces and ordered a few pieces I didn't need.

Plumbingpieces.jpg
 

meschaefer

One to Ignore
Location
Astoria
Rating - 100%
30   0   0
As I mentioned in an earlier post, I had a three pieces of glass cut to size to make baffles. Each piece was 23 x 17, made from 1/4 inch glass with the edges ground down. My sump is a standard size 120 gallon tank, it was reef ready and I cut the overflow out of it. I used pieces from the overflow to patch over the holes for the overflow, and to "even" out the bottom of the tank caused by bracing.

I used a square to line up each of the baffles before sealing them into place with GE 1200 Construction Silicone which was recommended to me as being "reef safe" and which is allegedly used by a major custom tank manufacture. A little bit of painters tape held the baffle in place while I used a caulking gun to apply the silicone.

square.jpg


The center baffle was the toughest, as it needed to be raised up into place. Each baffle is spaced 2 inches apart, and the center baffle is raised two inches off the bottom of the tank. I used a piece of pink insulation as a spacer and a place for the baffle to rest while the silicone dried overnight. In order to silicone the side between the center and outside baffle, I put silicone on the baffle and then used a spoon attached to a stick to smear it into place.

spacing.jpg


I then put the third baffle into place. Tomorrow I will cut the holes for the bulkheads.

top.jpg


baffles.jpg
 

masterswimmer

Old School Reefer
Vendor
Location
NY
Rating - 99.6%
448   2   0
Nice job Matt.

FYI for those attempting this same DIY in the future. Always drill the tank first. I've never heard of anyone cracking a tank by siliconing baffles into it. However, there have been many a mishap from drilling a tank. If the tank were to crack from drilling, it will just make the effort of siliconing the baffles into place a worthless, time consuming waste of time.

Patience, WATER and a good drill bit and I'm sure you'll be fine. TAKE IT SLOW. Remember, you're not drilling the glass per se, you're grinding it.

Russ
 

meschaefer

One to Ignore
Location
Astoria
Rating - 100%
30   0   0
Nice job Matt.

FYI for those attempting this same DIY in the future. Always drill the tank first. I've never heard of anyone cracking a tank by siliconing baffles into it. However, there have been many a mishap from drilling a tank. If the tank were to crack from drilling, it will just make the effort of siliconing the baffles into place a worthless, time consuming waste of time.

Patience, WATER and a good drill bit and I'm sure you'll be fine. TAKE IT SLOW. Remember, you're not drilling the glass per se, you're grinding it.

Russ


I thought the same thing. I ended up doing it this way, just due to timing. I wasn't ready to drill the tank but I had the baffles ready to go. I thought about waiting, but in the end decided that I needed to keep my momentum by getting something done. Worst case scenario I need to cut out the baffles.

We will see.....hopefully will have pics of the drilling process up tonight.
 

meschaefer

One to Ignore
Location
Astoria
Rating - 100%
30   0   0
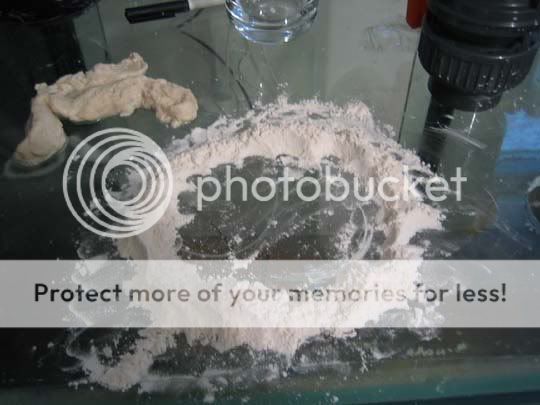
I was able to cut the holes for the bulkheads in my sump. I needed to cut two holes, one for a 2 inch bulkhead and the other for a 1.5 inch bulkhead. After allot of research on how to make the cuts, I decided to make a dam so that the hole could be cut in some water which will help keep the saw and glass cool.

I had wanted to make a dam out of clay but I forgot to pick it up when I was out of the house, so I took some flour and water and made some dough. The dough worked pretty good, but for the second cut I just made a dam out of some flour which believe it or not worked allot better.

dough.jpg


flour.jpg


This is the bit I used to cut the hole for the 1.5 inch bulkhead, it was fairly inexpensive running me about $5. It was shipped straight from Hong Kong.

bit.jpg


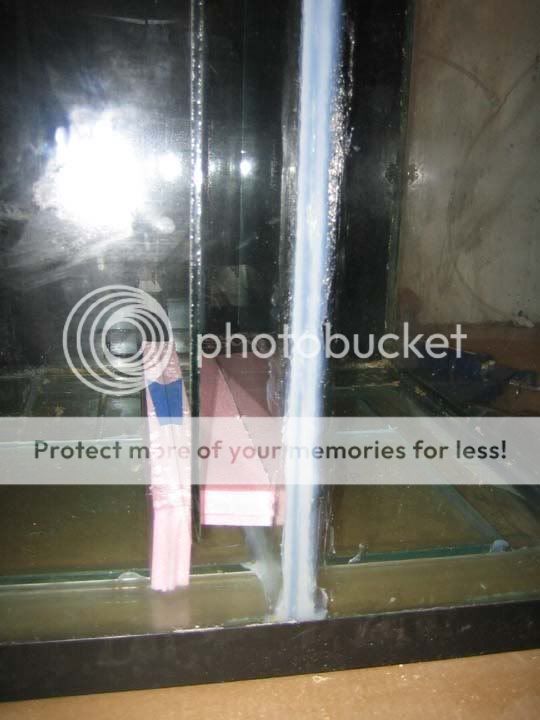
The problem with getting the hole started is that the bit wants to "walk". I used two clamps to act as guides while I got the hole started.

flourguids.jpg


I went real slow, and didn't let my drill pick up too much speed. Each hole took me at least 10 minutes to cut.

hole.jpg


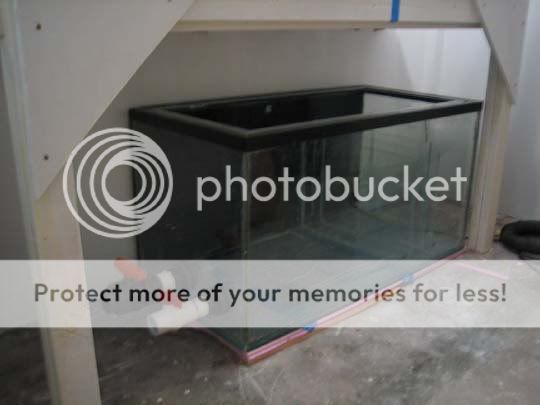
After that was done I screwed on the bulkheads and put the sump into place. This is the finished product. Look at a that starphire...it really makes a difference.

SumpinPlace.jpg


I was able to make allot of progress this weekend. I sheetrocked the area behind the sump, finished of the wall and got two coats of paint on it. I got the sump into place, reinforced the stand a bit and I am starting to fill the display tank with water. I figure it will take almost 4 days to get the sump and display tank filled with RO/DI water. Once it is full, I will add salt and get all the pumps moving to mix it up. Now I just need to finish off the plumbing.
 

meschaefer

One to Ignore
Location
Astoria
Rating - 100%
30   0   0
We now have another resident drilling expert. Congrats Matt. I know you had your heart in your mouth. I'm sure you're glad it's done and you were successful. Great job.

Russ

You definitely stop and think about it before you start. I kept telling myself that it really didn't matter as I had gotten the tank for free from Rich.

The display tank is about a third filled with water...
 

Sponsor Reefs

We're a FREE website, and we exist because of hobbyists like YOU who help us run this community.

Click here to sponsor $10:


Top