• Why not take a moment to introduce yourself to our members?

kimoyo

Advanced Reefer
Rating - 100%
26   0   0
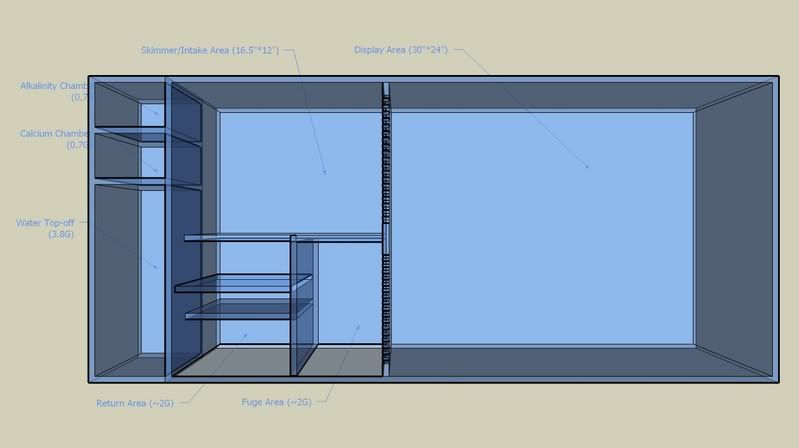
I'd been trying to decide on a new tank for a while. I knew there were things I didn't like when I had my 120G in my apartment. Every time I left I would worry about some flood happening. And I didn't use the top 12" for any corals, it was really just open space for fish to swim around. I definitely wanted to make the tank shorter so I could go down on lights and no matter where I put my 120 in my bedroom, I could only use 2 panels to look in. The first thing I decided to do was to make it an AIO (All In One) tank. I mulled over it for awhile but LeslieS's thread really made me commit to doing it sooner than later.

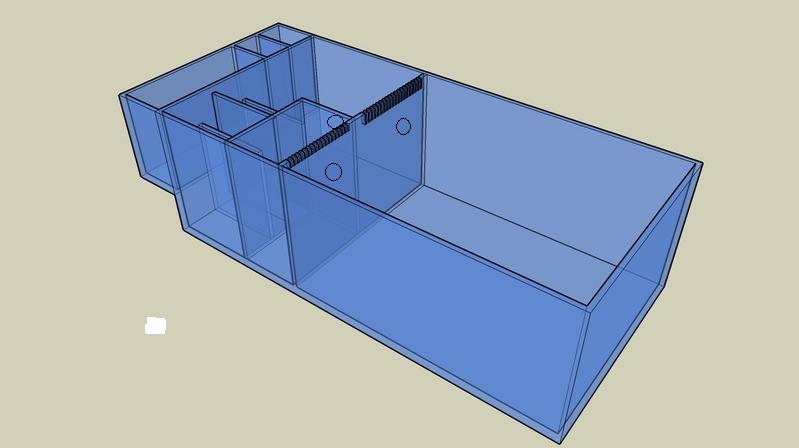
I put thoughts to paper (or cad program in this case) and came up with this.

kimoyotank2.jpg


kimoyotank1.jpg


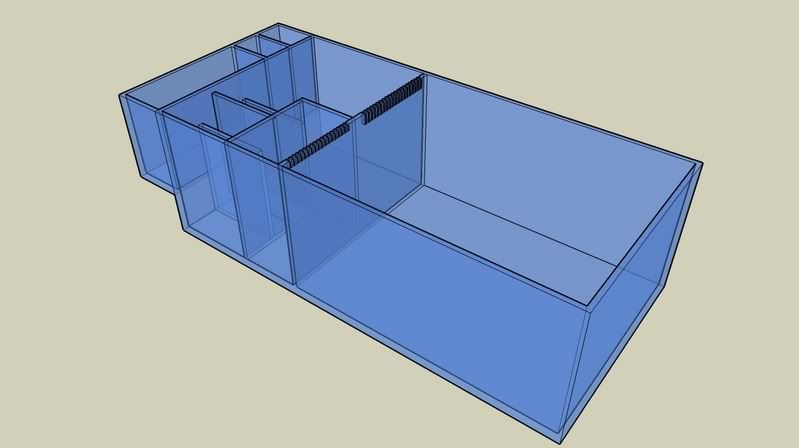
And then I made designs a reality with this.

DSCN0943.jpg


I finished it yesterday and these are the first pics today. It will fit perfectly on my 120G stand which is great but its only 15" tall with a water height of 14" in the display. I'll clean it up and take some better pics once I get it home.
 
Last edited:

kimoyo

Advanced Reefer
Rating - 100%
26   0   0
System Ideas

So the idea of this system is in part based on the KISS method (Keep It Simple Sucker), make it as simple as possible. I wanted to eliminate all the extra plumbing and gadgets so I designed the tank around that. I could have gone with a calcium reactor but decide to dose two part instead. I've seen a lot of nice tanks maintained with just two part and some tanks with water changes only, so I know 2 part can work, its just a question of how it will be dosed. I also went with the 14" tall water height so I could use either a 150W or 175W metal halide. The extra foot in height was nice but I want to focus mainly on corals. So here's a list of equipment that will hopefully be used.

Tank: NY Acrylics 1/2" AIO :)D so cool to say that)
Water movement: two Hydor KORALIA 3 powerheads
Return Pump: Hydor Seltz L35 pump
Lighting: 2' PFO Solaris (gonna save up for this one)
Top off/Dosing Pump: Reefdosing pump / Tunze Osmolator
Skimmer: NY Acrylics very soon ;) but for now I'll be using a Das EX-2 I got for a good deal on here.
Carbon/Phosban: 1 or 2 phosban reactors. Depends on how many will fit.
Chiller: 1/4hp Aqualogic trimline cyclone that I kept from my 120G.
Controller: ACII
Equipment will be obtained over the next few months. I have a bunch of live rock that will be cooked in the tank for a month or two ahead of time.

So here's another thing I'm excited about. I will be using 100% NSW (natural sea water) for this tank. I'm going to head out to the tip of LI, collect about 100G for my first trip. Then I'll probably go out every 2 months and get 40-80G. I hope to change at least 20G (50% display volume) once a month. Since the tank is smaller I was really thinking of doing 100% water changes every month but haven't decided yet. I'm still researching everything I have to do with the water but I would prefer not to have to process it. Although, I do have very strong UV that I could run the water thru in a closed loop if needed.

For livestock I was planning on a bunch of corals, sps, lps, etc. And for fish right now I'm set on getting a Golden Angelfish. But other than that its pretty open.
 
Last edited:

kimoyo

Advanced Reefer
Rating - 100%
26   0   0
Dude, market this and make yourself a cool million.

Not on MR, home of the "where the $5 frag at" hobbyist. :lol2:

This is version 1, I have a few other designs I want to do but can't until I make my skimmers, I was limited on this design with the Das. Once I can design/make the skimmers, I can incorporate a new tank for them which I'm looking forward to.

Deanos, Tonyscoots84 Thanks.

BTW, in the picture is says there will be a fuge compartment but thats a remote dsb area now. Once I get it cleaned up I'll explain the flow.
 
P

Pedro

Guest
Rating - 100%
182   0   0
Pretty cool design. Nice to see when ideas become reality. Would love to see it once it's all done and in operation.
 

Davidl919

Advanced Reefer
Rating - 100%
20   0   0
Wow. I really like it. Could you make something like that with the compartments to the back instead of the side. Like the way a hang on overflow works?
I love the diagrams will be taking autocad class in september.
 

jhale

ReefsMagazine!
Location
G.V NYC
Rating - 100%
52   0   0
You built My dream tank!

Congrats that's awesome. I'm glad you made yourself a prototype :D

Someday I can't wait to order a larger one :party:
 

loismustdie

chicks dig beckett men
Location
Brooklyn
Rating - 100%
31   0   0
Not on MR, home of the "where the $5 frag at" hobbyist. :lol2:
That's perfect. I'm sure members would trade you "some nice zoas" for that system.
Everyone take note, this is how it's done. He waited until he had a finished product before starting a long, sloppy unreadble thread (like most of your tank threads).
Great work Paul. I'm liking the idea. If you got rid of the fuge section, that would give you a lot more room for a better skimmer.
 

kimoyo

Advanced Reefer
Rating - 100%
26   0   0
Awibrandy - Thanks

Pedro - Thanks, your welcome to stop by in a month or so when its running. And thats pretty much of all MR members.

chazertis - lol, nah there was some planning. I've shown similar cad's this past month but not the final design. I've been asking some questions here and there to help it along; remote dsb, can you keep pods in the dark, starboard, etc. Thanks!

Frank - You'd be surprised how much you really helped me do this by being such a great customer! Once I open back up if there is anything you need let me know!
 

kimoyo

Advanced Reefer
Rating - 100%
26   0   0
DaveL - Sure, the compartment on the side is how some people do their external overflows. Moving it to the back would've been the same work. Its just that in my room the side would work better, but the back would have given much more top-off area. I was really debating having them on the side and back at the same time. The back could have been my frag rack and places to grow pods. But I kinda want to have my frag tank separate from the system so I can put incoming frags in there.

Forget the autocad class. From what Dave told me about you, just download the free version of google sketchup online and start working. Thats what I made these drawing from. To me the free version is exteremly limited because I've done a lot of work with solidworks but its free! Sketchup is very intuitive and impressive, if I was getting a full cad right now I would pay for their pro version.

jhale - lol, not really. There are several mistakes and things I'm not happy yet. Once I get into my new shop I can start putting out some really nice stuff. I would have really like to go bigger with this especially since it was shorter. Something like 5'*3' for the display with an extra 2' on the side for the sump. But I already had my stand made and its harder to have a large tank in an apartment IMO.

Dmitry - Thanks. It's 15" high and the water level is 14" high. There's two main reason for this. Firstly, I don't want it to be taller. I'm concentrating on corals and smaller fish so the extra height, while nice, isn't necessary for me. With this setup I can go with 175W halides and it will be like 400W halides on a 2' tall setup. The second and probably more important reason is that the tank is braceless. I really really wanted a braceless tank and since I only had 1/2" acrylic on hand, 14" water height was the tallest I could make it and feel safe. It all worked out perfectly because that height was the biggest I could go with the acrylic I had laying around.
 

kimoyo

Advanced Reefer
Rating - 100%
26   0   0
Chris - Thanks. In the past I haven't like fuges too much, but so many people want them. So I was thinking of putting a fuge in there mainly to grow pods. But I've seen people take out fuges and have their nutrient levels drop so I was kinda 50/50. Then I solbby reminded about remote dsb's (filtered incoming water) and decided to do that instead. I read a thread on RC where you were talking about it and it made me feel better with my decision.

LeslieS - Thanks, I know you were talking about doing this also, so once its running feel free to stop by to look at it. One thing I wanted to make sure of with this design is to not have my pods or anything I'm feeding my tank to go thru a pump. When I take closer pics and explain the flow you'll see that the divider has water flowing into the sump and out at the same time. You have to be a bit more careful when doing the design but hopefully it will work well.
 

Dace

Advanced Reefer
Location
Manhattan
Rating - 99.7%
393   1   0
Very well thought out and made. The black acrylic looks incredible. As for using a liter meter to dose your setup would be something you would have to practice with during calibration. They are not extremely accurate when it comes to Small amounts of dosing due to it breaks the actual daily dosage into 150 doses. If it was my tank, any plumbing over the top would be unacceptable the tank looks to nice and would take away from the beauty of the tank. I would use a Ehiem 1262 and drop it i the return area and drill 3 x 3/4" bulkheads under the overflo draining area. 1 in the return section and 1 in the fuge dividing wall and 1 in the fuge drain wall area. If you keep the plumbing close to the black acrylic drain wall and if you use black plumbing it would not even be noticeable. I know this would mean you would have to drill through the fuge area also but if done correctly. it would look real professional which i don't think would be a problem for you.
Job well done.
 

Attachments

  • kimoyotank3.JPG
    kimoyotank3.JPG
    22.8 KB · Views: 193

Sponsor Reefs

We're a FREE website, and we exist because of hobbyists like YOU who help us run this community.

Click here to sponsor $10:


Top