- Location
- Greenpoint Brooklyn, NY
I've always been amazed with the small things that happen in tanks. You can have all the expensive fish and coral in the world and i'll be there checking out your cleaning crew or the acro crab in your ultra rare colored stick colony.
I always planned on setting up a small 2-5g nano somewhere but never had the patience or time. Plus the lighting sucked 3-4 years ago and the nano forums were void of any usable good information on anything other than your standard 5g tanks.
Anyways, it all started when i had a few extra 3W LED's and i had to order some extra parts for my LED actinic strips i built for my 180. While researching I seen that alot of the LED builds popping up were based on modding LED's into nano and pico beta tanks and then it came to me :idea:
And the sky opened up.....

...followed by some sparkles .....

....and some weird things happened
(i can't show you that here) .....
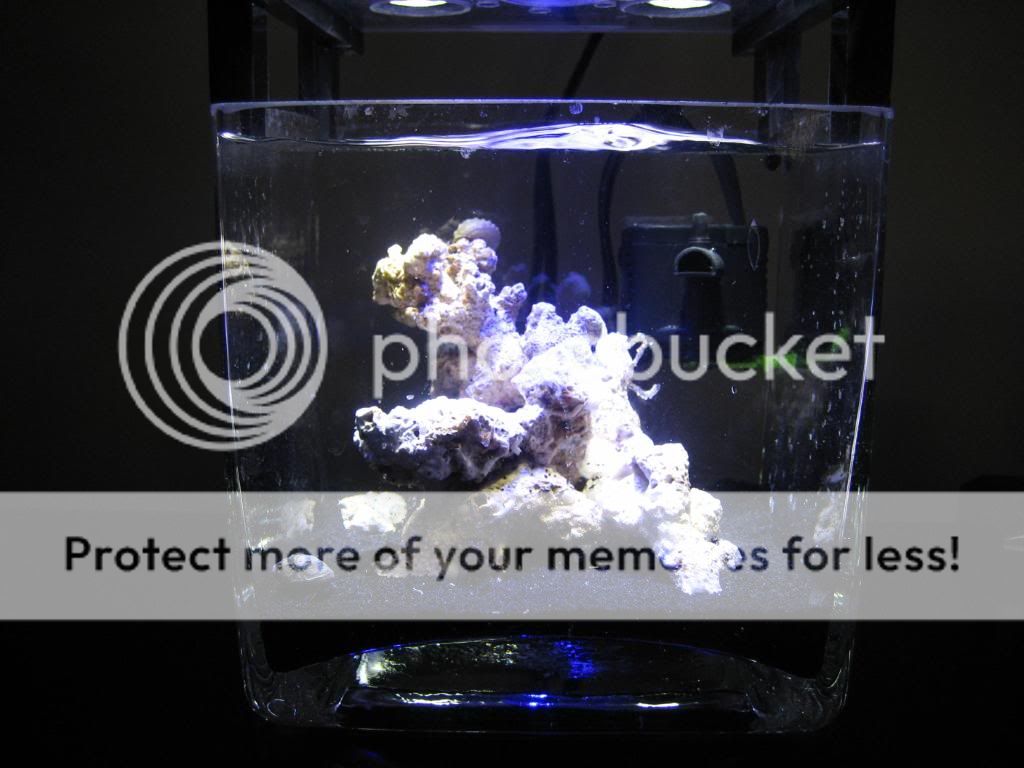
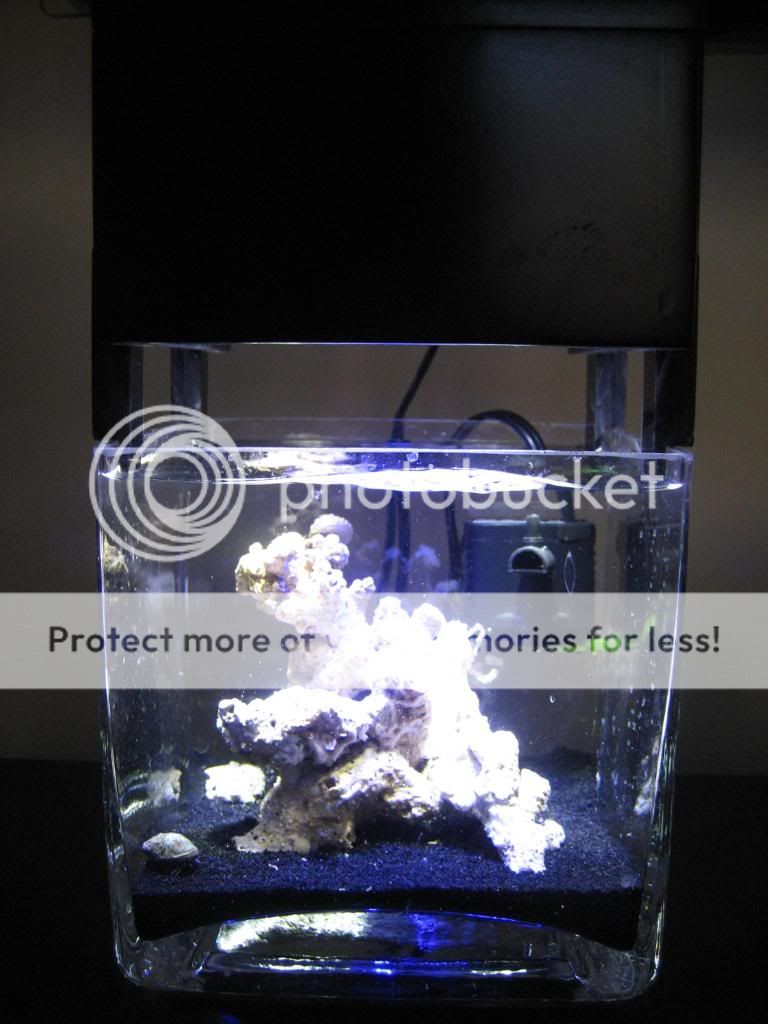
and I now almost own a PICO! .59g to be exact before LR and some sand. (my wife is gonna kill me btw)
I put on my special DIY gloves...
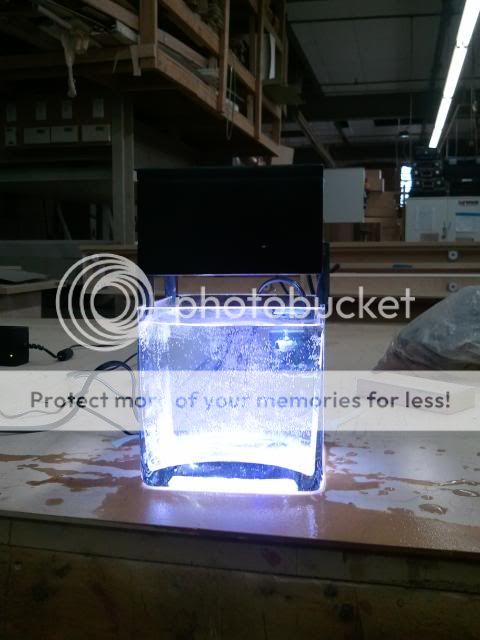
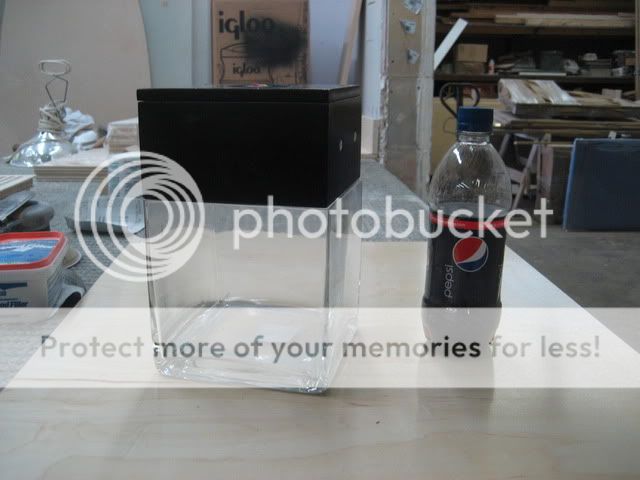
 ....for another DIY frenzy. I ordered some extra LED's and a dimmable driver to get my LED fixture going and started work on the light box for my micro ecosystem. The fixture is small @ 5 3/4" and sits 3 1/4" high which fits perfectly on the 5 3/4" square vase i picked up today from the florist.
And after some tinkering and sweat.....
 !!!
!!!
Its still not finished. I still have some touch ups to do like paint those screws and build the mounting brackets.
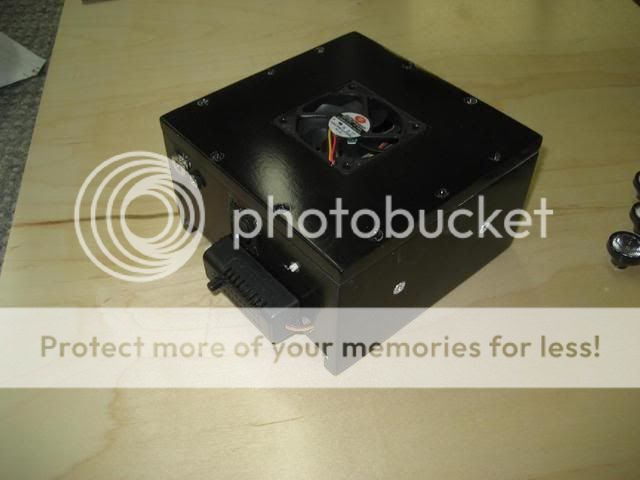
Under the hood of that BEAST of a LED fixture....

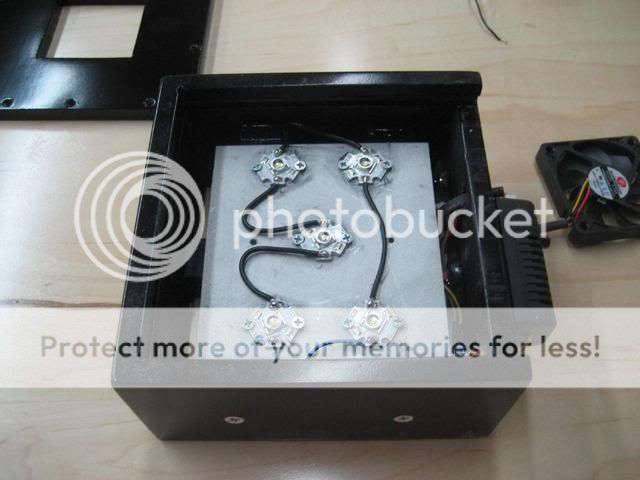
....is definitely not a cute picture of a puppy dressed up for xmas. But there are 5 x 3W Cree LED's. 4 white and 1 Royal Blue run on a dimmable mini BuckPuck.
The LED array is standard + - looped back to the opposite pole on the driver.
LED specs
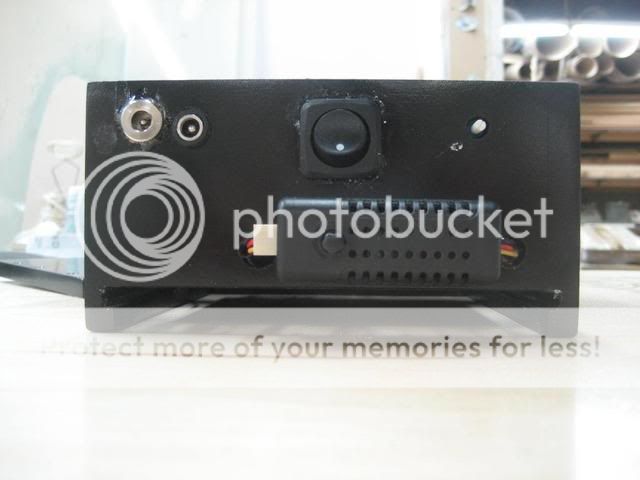
I started with making a removable top where i access all the electrical in case i ever needed to. On the back of the fixture i have access to the Pot to dim the LED's, power switch for the lights, and jacks to plug in the power to the fan and lights.
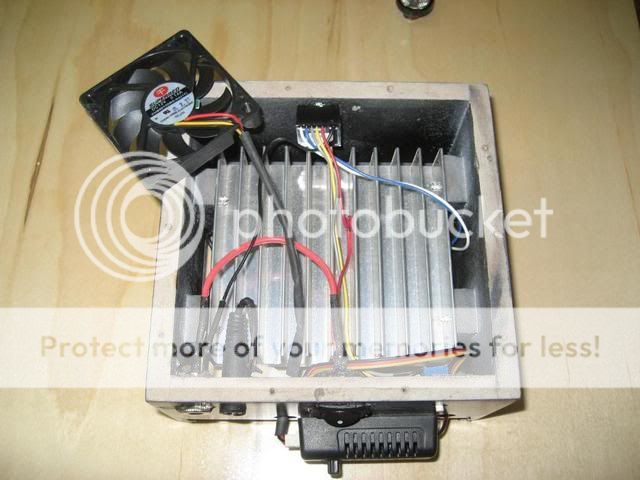
Yes, i need goof-off too to get rid of that messy glue as well.
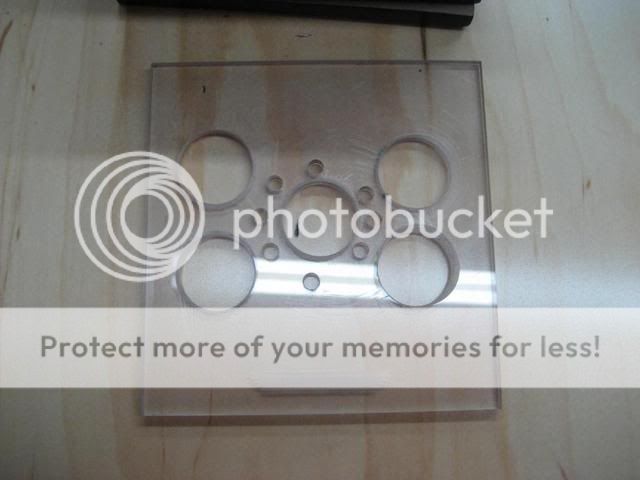
And made a slide out Plexi cover for the bottom to control the airflow to pass through LED's for cooling. The box is pretty much sealed except for the area around each lens and some holes that were drilled. I used UV resistant acrylic i had laying around as it doesn't soak moisture up and warp as quickly as your standard acrylic.
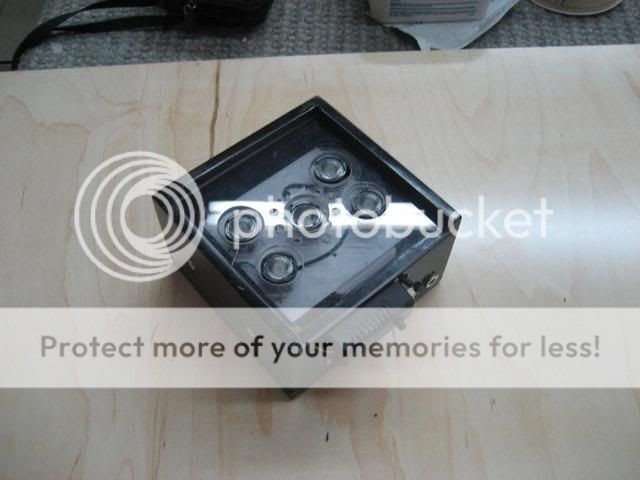
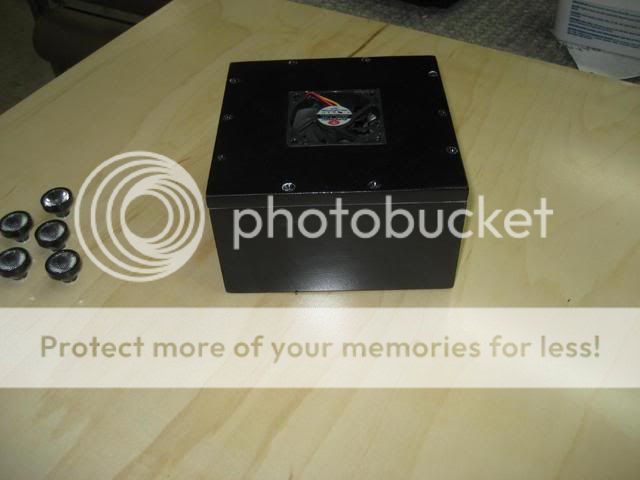
A simple black box. The only thing thats missing is some mounting brackets so i can sit it above the tank an inch or so.
And here is my empty canvas =0)
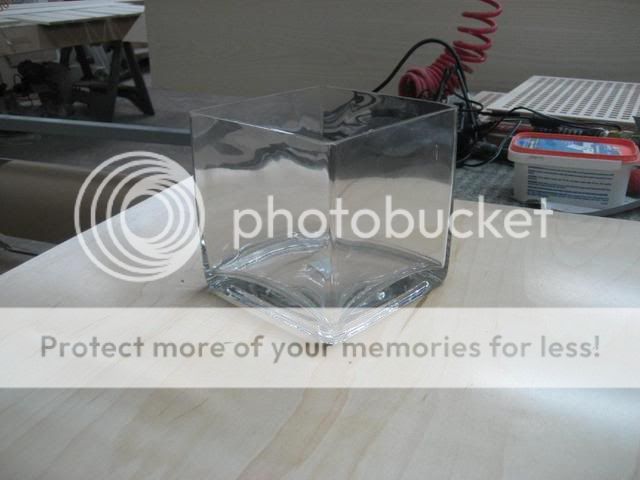
Its blown glass but I think its going to be fun working with. I'll be purposefully stopping by any and every florist or vase shop till i find that perfect 5-7" square vase or a really nice round one though. Michaels apparently has the 7" vases which i planned on using first but I haven't had the time to check it out.
And thus my journey begins....and for some reason I feel its going to be a painful one :fishhit:
Tank Specs
Its a small tank and small tanks are prone to two things which make or break them. Evap that causes salinity spikes and extremely quick temp swings or high highs and low lows at night.
I just started research into Flexwatt heat pads that you place under the tank to take care of heating and a way to control it, so other than "i've seen a few pico's use them" thats all i know. Or the other option of getting the small betta heaters and manually turning it off when i need it. I'll keep this updated on what i decide.
Im going to deal with evap using a simple suspended gravity fed ATO (hamster bottle). I just have to figure out how to mount it so it looks clean. Thinking off the side or back and using one of those small RC airplane gas bottles. I just have to figure out how much evap i'm getting so i can't start till I set it up and run it without livestock.
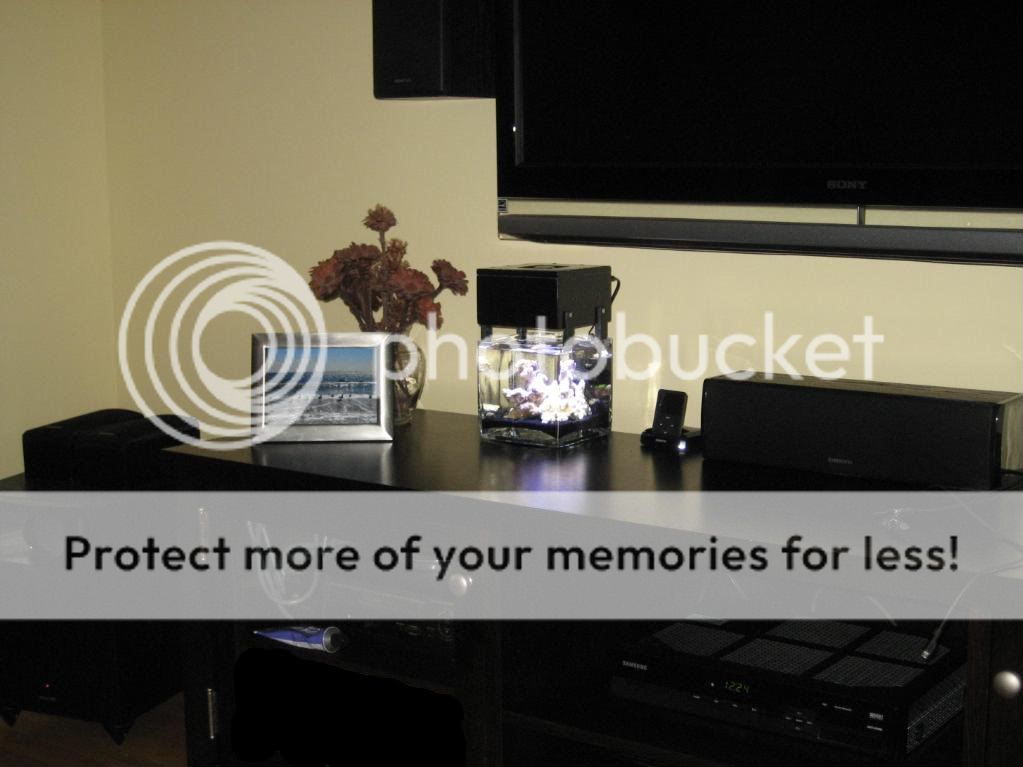
I think thats it for now. I will try some small SPS frags (a 1/8" mini SPS forest!) to see how they fair after a month or two of the tank running and stable.
I'll update with pics of it up and running in a week or so.
I always planned on setting up a small 2-5g nano somewhere but never had the patience or time. Plus the lighting sucked 3-4 years ago and the nano forums were void of any usable good information on anything other than your standard 5g tanks.
Anyways, it all started when i had a few extra 3W LED's and i had to order some extra parts for my LED actinic strips i built for my 180. While researching I seen that alot of the LED builds popping up were based on modding LED's into nano and pico beta tanks and then it came to me :idea:
And the sky opened up.....
...followed by some sparkles .....
....and some weird things happened
(i can't show you that here) .....
and I now almost own a PICO! .59g to be exact before LR and some sand. (my wife is gonna kill me btw)
I put on my special DIY gloves...
And after some tinkering and sweat.....
Its still not finished. I still have some touch ups to do like paint those screws and build the mounting brackets.
Under the hood of that BEAST of a LED fixture....
....is definitely not a cute picture of a puppy dressed up for xmas. But there are 5 x 3W Cree LED's. 4 white and 1 Royal Blue run on a dimmable mini BuckPuck.
The LED array is standard + - looped back to the opposite pole on the driver.
LED specs
- 5 x 3W Cree XR-E LED's with 4 45 degree lenses and 1 80 for the blue
- BuckPuck 3023-D-E-700Pma with wired POT
- 4 1/4" x 3.9" Pre-tapped heatsink for 6 LED's
- 24V 1.5a AC to DC power supply
- 60mm low profile fan with speed control and 12V 300mah power supply
- Power switch and a few jacks to plug in the fan and lights (still waiting on a power switch for the fan to come in
I started with making a removable top where i access all the electrical in case i ever needed to. On the back of the fixture i have access to the Pot to dim the LED's, power switch for the lights, and jacks to plug in the power to the fan and lights.
Yes, i need goof-off too to get rid of that messy glue as well.
And made a slide out Plexi cover for the bottom to control the airflow to pass through LED's for cooling. The box is pretty much sealed except for the area around each lens and some holes that were drilled. I used UV resistant acrylic i had laying around as it doesn't soak moisture up and warp as quickly as your standard acrylic.
A simple black box. The only thing thats missing is some mounting brackets so i can sit it above the tank an inch or so.
And here is my empty canvas =0)
Its blown glass but I think its going to be fun working with. I'll be purposefully stopping by any and every florist or vase shop till i find that perfect 5-7" square vase or a really nice round one though. Michaels apparently has the 7" vases which i planned on using first but I haven't had the time to check it out.
And thus my journey begins....and for some reason I feel its going to be a painful one :fishhit:
Tank Specs
- 5 3/4" square glass vase roughly .59g before rock/sand
- Custom Cree 3w 5LED fixture 5 3/4" x 3 1/4"h
- slightly modded minijet 404 or 606 pump - Controlled @ 18gph at the lowest setting for the 404 which should be enough for SPS in a tank this size
- Hamster bottle ATO
- Flexwatt heat pad/betta tank heater
- Black Tahitian sand
- some LR. I'll weigh it before it goes in =0)
Its a small tank and small tanks are prone to two things which make or break them. Evap that causes salinity spikes and extremely quick temp swings or high highs and low lows at night.
I just started research into Flexwatt heat pads that you place under the tank to take care of heating and a way to control it, so other than "i've seen a few pico's use them" thats all i know. Or the other option of getting the small betta heaters and manually turning it off when i need it. I'll keep this updated on what i decide.
Im going to deal with evap using a simple suspended gravity fed ATO (hamster bottle). I just have to figure out how to mount it so it looks clean. Thinking off the side or back and using one of those small RC airplane gas bottles. I just have to figure out how much evap i'm getting so i can't start till I set it up and run it without livestock.
I think thats it for now. I will try some small SPS frags (a 1/8" mini SPS forest!) to see how they fair after a month or two of the tank running and stable.
I'll update with pics of it up and running in a week or so.
Last edited:

") subscribed
subscribed