


You are using an out of date browser. It may not display this or other websites correctly.
You should upgrade or use an alternative browser.
You should upgrade or use an alternative browser.
new calcium reactor
- Thread starter parvo
- Start date


Parts and source
all pvc was purchased at lowels and home depot
2 - 4" pcv flange w/ knockouts intact
4 - 1/2" 90's
1 - 1/2" cross slip x slip x slip x slip
1 - 1/2" 90 male thread x slip
3 - 1/2"slip x 1/4"thread
2 - 1/2" ball valve
4 - 1/2" male thread x 1/2" slip
1 - 1/2" T slip x slip x slip
3 - 1/2" union
6 - 4" couplings
1 - 1/4" tube x 1/4" male thread (jaco fitting) Aquatic ecosystems
3 - 1/4" tube x 1/4" male thread elbow/ 90 (jaco) AQ eco.
?ft of 1/4" O.D. polyethylene tube aquatic eco.
2 - 4" Hand-tite expansion plugs Aq. eco.
2 - 1/4" john guest valves (savco plastics, columbus oh)
1 - 1/4" male thread x 1/4" speed fitting john guest ( savco)
1 - 4 oz. weld-on 16 purchased at a acrylic place in town
1 - 1/4" NPT tap (aq. eco.)
1 - 1/2" NPT tap (aq. eco.)
1 - 1/8" NPT tap (aq. eco.) not used in this project
1 - 23/32 drill bit MSC Industrial Supply Co.
1 - 7/16 drill bit Lowels
6ft - 4 1/2" x 4 1/4" x 1/8" extruded acrylic US Plastics
1 - roll of teflon tape
1 - cotainter of teflon paste
1 - needle valve Marine Depot
1 - mag 5 pump Ebay
1 - 5lb co2 cylinder Geer Gas Co.
?ft co2 tubing other misc tubing
1 - 3/8" x 1/4" adapter (for needle valve modification)
1 - 1/4" x 1/8" bushing (for needle valve)
Misc. plywood for base (laying around the house)
misc. black foam padding for base ( laying around the house)
1 bubble counter from Geo
approx 4'? of 4 inch pvc. (used for the fittings)
I believe this is everything? I did list the price for each items. lets just say for both chambers and plumbing cost around $100 and the tank, reg, needle valve about the same. You can get most of this stuff at a endless # of places but I got mine at the above places for different reasons, best price, there at the time, quick fix, wasn't thinking at the time. etc. Do your homework The final product has a few modifications that are not shown in the pics. I will explain if I remember. The lengths of the clear acrylic are about 26inches why they are that length I don't really know they can be however long you want them to be?
I fist drew out what I wanted to build (It changed severl times even as I was building it) I cut my pvc with pipe cutters and acrylic with a hack saw. All of the pieces are laid out in one of the following pics. I dry fitted my pieces to see how it would actually look put together (this is where I changed the design) I marked the pieces with a marker (hash mark) so when I glued them together the holes for the plumbing would match up right. (first pic posted)
the following is the process of making the chamber (both chambers)
bottom of chamber: I glued the 4" flange to the 4" coulping using 4"pvc pipe and pvc glue (I used pvc cleaner before I glued. I also made sure that the pvc pipe was the right length so that the flange and coupling would be flush with each other to give it a clean look )
Top of chamber: glued 2 4" pvc couplings together and piece of pipe inside the top of the coupling where the cap goes. (the pvc is there so the plug can be screwed tight with a few turns)
Center of chamber: I glued the acrylic to the top and bottom of the chamber with weld-on 16 before glueing the acrylic to the bottom section I inserted a 4" drainage cap (immediatly to the right of the chamber in the fist pic) I forgot to mention this part in the list. these are very important (gives you a chamber below your media/ hold your media off the bottom) I also put a fine mesh screen on top of the drainage cap (pre cut 4" sreens bought at Joanne Fabrics, found while waiting for my girlfriend) the screens can be put in later (removable)
I let everthing set for a couple of hrs. before I started drilling the holes for the plumbing. The holes are drilled into the sections w/ the pvc pipe. I personally didn't want to f...up my work by drilling into the acrylic and cracking it. If you are comfortable working with acrylic and have the right tool you can make modifications to the design and leave out any unnecessary portions (top section you can omit the top coupling section)
Anyways I already marked my plumbing layout so I drilled the holes with the 23/32 drill bit then tapped it with the 1/2" tap thread.
I also drilled the black cap with the 7/16 bit and then the 1/4" tap thread
I used teflon paste on the threads before I attached the pvc to the chambers (or you can use teflon tape) to get a leek free connection.
the rest of the plumbing was done with pvc cleaner and glue. I'm not going to list the step by step (look at the pics) you may want to plumb it differently. Some important thoughts I plumbed in unions for easy disassembly. I also plumbed in valves so I could change the pump if needed or do maint. on it w/o flooding the floor with sw. make sure you put in a check valve from your bubble counter to your regulator. zip tie or hose clamp your lines I have to wait to see how the ca levels go up because my zip tie didn't hold the line on the reg and it blew off and drained a newly filled tank
I also had to make a run to home depot to get brass adapter and bushing to connect my needle valve to the reg and bubble counter.
I used a foam padding under the unit to keep vibration noise at a minimum
I think thats everything?? Any ? or comments?
Please comment I always like to learn something new
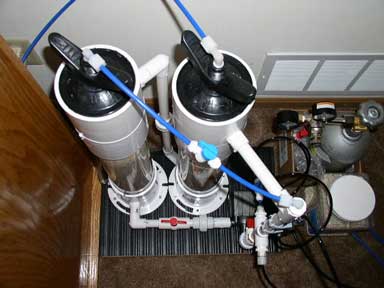
the flow is from the pump on the right to the bottom of the left chamber up through the media out and down to the right chamber, through the media and out and down to the pump. the blue line from the left chamber to the 1/2" pvc on the right is a recirc. line for the co2. the 1/2" pipe is the intake line of the pump. the effluent to the tank is from the blue line on the top of the right chamber.
Attachments
There is nothing good or bad about your particular setup for the second chamber. In your case, it is equiv. to breaking a tall chamber into two shorter pieces, while in regular secondary chamber design, it is used to scavage the extra CO2 and make sure the output is not acidic.
WHAT?! You never said anything about building a reactor?! (Sloth from RC here :wink: ) That is awesome. I was just starting to think about attempting my own. How long did it take to put the whole thing together? Think a miniature one could be made with your design? (maybe just shorter).
rock on
rock on
It took a couple of hrs. to put together. I let the reactor sit overnight after I glued the acrylic to the pvc. KorbinDallas if you want to make one let me know I was thinking about making another one. I have extra pipe. I am going to make a mini with a sand filter I had lying around.
Sponsor Reefs
We're a FREE website, and we exist because of hobbyists like YOU who help us run this community.
Click here to sponsor $10:
