annanymous

Female Reefer
Location
Brooklyn
Rating - 100%
9   0   0
After 3 long months of working on my DIY stand for the 75 gal tank I think its time to start a build thread. Maybe this way I will work faster and finish it already!

Anyway, a little background...I used to have a 90 gal back when I was in college some years ago (heck...who's counting :shhh:). Anyway, I had to sell it all due to the amount of time I had to devote to my studies. Now that I have happily finished all the years of torture (schooling:goldfish2) and am married with a toddler on the run around the house, I feel its time to delve back in. I?m tired of hungrily looking at all the amazing tanks here and RC. I want my OWN!
This was my very first DIY experience?turned out OK but made many mistakes and was pretty unusable on the inside (hence the sump on the side of the tank).


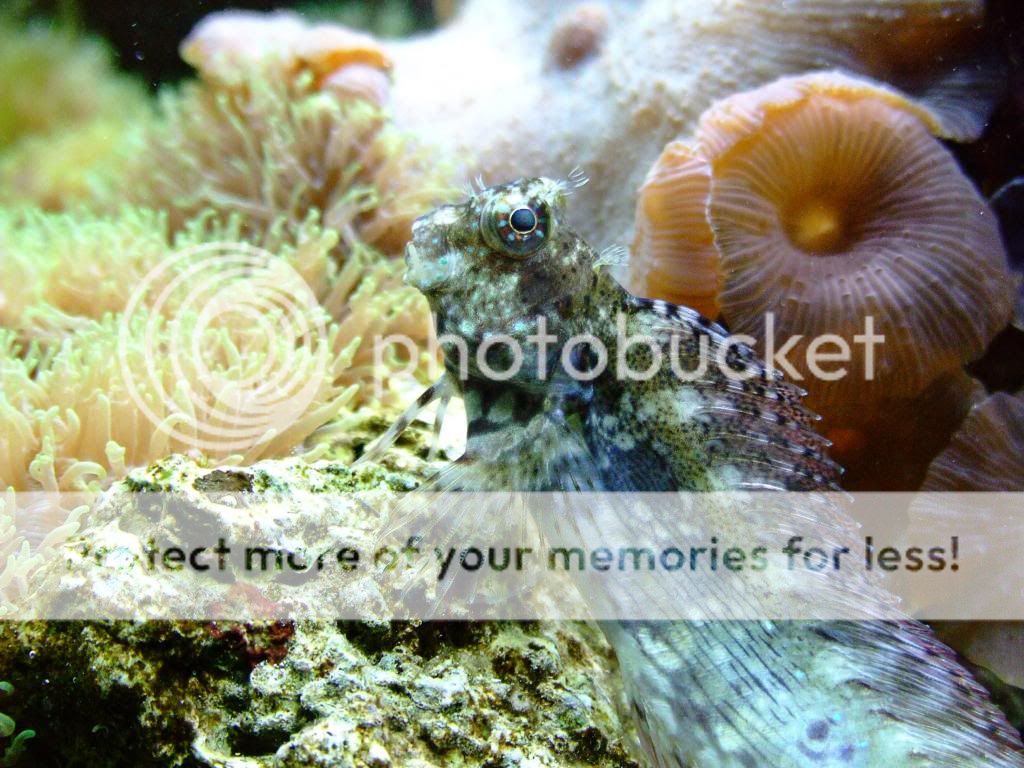
And these are some of the best memories I have of my reef:


Last edited:

annanymous

Female Reefer
Location
Brooklyn
Rating - 100%
9   0   0
Anyway, back to this thread topic...I will post a lot of pics of how I built the stand as well as my mistakes and lessons learned.

I bought a RR 75 back in May and decided to do the DIY stand as I always liked the look of taller stands and certain internal dimensions.

Mistake #1: (there will be many!) instead of measuring the dimensions of the tank I had purchased, I just googled a general 75gal dimensions and based all my stand measurements on that. Very stupid as it doesn't always account for the plastic casing but just glass.

Last but not least (before I start boring everyone with my crappy shots of the DIY stand) I wanted to share some WOODART...Hehe
 

annanymous

Female Reefer
Location
Brooklyn
Rating - 100%
9   0   0
So after researching all the options of stand backbone I decided to go with the slightly modified general plans I found on RC


Started the actual build on May 18, 2013. Lets see how long it takes me to finally finish the stand.
 
Last edited:

annanymous

Female Reefer
Location
Brooklyn
Rating - 100%
9   0   0
The plan for this set up is:

- 75gal RR Oceanic glass tank
- DIY stand 48x18x36
- 2x Photon16 LED fixtures by Evergrow
- 2x Ecotech Marine mp40s
- either Trigger Ruby 30 or custom built sump by customking (still working on this)
- Reef Octopus 150 skimmer
- eheim universal 1262 for return pump
-tunze ATO
- TLF 150 reactor for GFO
- Kent marine Nautilus reactor for either bio pellets or carbon
- 9w coralife turbotwist UV (not sure if Ill be including this into the set up from the start)
- will be using dry rock seeding with a small LR piece
-still deciding whether to go BB or 2 inches of sand

I hope I didn't forget to include anything.
Would love some input
 

annanymous

Female Reefer
Location
Brooklyn
Rating - 100%
9   0   0
look at the skimz line of skimmers.
I would scratch the uv (just my input)
Heater
Ato top of container (glass tank, bucket) for under or side of tank...

Tony thanks for the input.
I already bought the skimmer (first thing I bought actually). As to the ATO container...it will either be a fourth chamber in custom sump or a 5gal jug from the water filter stand.
I have a 300watt heater, but will end up buying 2 of the 150s and proly a 75 for the QT tank.
 

annanymous

Female Reefer
Location
Brooklyn
Rating - 100%
9   0   0
Now for the actual build pics.

Sorry if this is a bit repetitive but i'm trying to be thorough.


Did the top and bottom frames first


then attached the vertical beams on all 4 sides and added the side pieces for sability.


annanymous

Female Reefer
Location
Brooklyn
Rating - 100%
9   0   0
Mistake #2: I had HD cut all the 2x4s for me and unfortunately they were not all exactly cut to size (maybe 1/8th or 1/16th off here and there). i didnt think it was a big deal at the start as it didnt look like much of a difference. however, once I started attaching pieces together i realized that i had some sticking out on top or on the bottom, making my stand uneven almost from the start.

I know people say to use wood glue before nailing wood together, but I didnt. my MISTAKE. maybe if I did I could have controlled the unevenness a bit.
 

annanymous

Female Reefer
Location
Brooklyn
Rating - 100%
9   0   0
at some point I got very fed up with the uneven surface at attachment points and took it all apart again and instead of using screws on the inside of the stand I decided to try the Kreg MiniJig to attach my support beams from the front, thus limiting the number of metal items coming into contact with saltwater in the future.


this helped, but as you can see in the last pic it still did not prove to be a fail-proof solution.
 

annanymous

Female Reefer
Location
Brooklyn
Rating - 100%
9   0   0
The work was kinda slow as I have to do all this in a spare bedroom and can only work like few hours a week on this project.
(already had calls from management about noise levels on the weekends :( )

This pic was taken on June 19th, so it took me over a month to just get to this point


PS: you can also see the RO 150 skimmer I will be using for this set up and the previously planned 30gal for sump. (once im dont with setting the tank up, I think the 30gal will be up for sale).
 

annanymous

Female Reefer
Location
Brooklyn
Rating - 100%
9   0   0
I took a sabbatical for 2 month to relax and enjoy the summer (translation.. was too busy to work on my stand) but took it back up as soon as temps cooled down a bit.

So next I added thin oak side panels (i believe they were 1/4 inch) and 3/4 inch bottom of the stand. I would have preferred to have thicker side panels but due t a slight miscalculation at the start of the build I needed to make sure the stand had appropriate length for the tank but not much wider as I wanted the majority of weight of the tank + water to be leaning on the 2x4s.


I also used plain sanded 3 1/2" and 4 1/2" 3/4"pine planks for the front of the stand as I was a bit nervous having to cut out an opening if wrapping front of stand in just one piece of wood. It worked out pretty good. Only problem i had was not measuring accurately (this seems to be a recurrent mistake I make).

If you look on the bottom left corner, you can see I had to add a small piece to finish the front. yes its ugly, but I do have limited funds for this stand and ran out of the planks that were long enough to cover entire front bottom. I still hope that after sanding and painting it will be near invisible.
 

annanymous

Female Reefer
Location
Brooklyn
Rating - 100%
9   0   0
One thing I learned from this experience...I suck with a nail gun! :fight2:

Oh and I put a thin backing into the stand to keep the evaporating water from dmaging the wal too much and to limit the Lights coming from the fuge (plan to have those 24/7). I also left an opening at the top for all the cables and pipes and air circulation that i may need.

Phew...only few more post to bring it all up to date :batangel:
 

annanymous

Female Reefer
Location
Brooklyn
Rating - 100%
9   0   0
now on to the doors.

I looked into ordering ready made doors but it turned out too expensive. So i decided to go the same route as the stand and use my Kreg MiniJig to create a frame for the door and attach a 1/4" siding in the back. I will also use plastic covers so that all the metal screws are covered and invisible.

It may not look like a professional door of a cabinet, but it will suffice for now. it is a bit too sharp for my liking but attaching any molding to it will make it look really weird.


a close up of the back of the door
 
Last edited:

annanymous

Female Reefer
Location
Brooklyn
Rating - 100%
9   0   0
next came molding on top and bottom. had some difficulty with cutting it as i dont own a mitered saw. used a jigsaw for this so not super even corners, but hell...at this point I just really want to finish the stand so I can move on to setting up the tank.


I did a lot of research on type of paint to use inside and outside. and the general consensus is to use oil based primer/paint (like Kilz) on the inside to create a waterproof and mold resistant surface and to use an acrylic external paint for the outside of the tank cuz it dries fast, hard, and durable (never took acrylic paint for durable, but who knows).

In any case, based on recommendations from a Lowes employee I purchased Kilz odorless primer for the inside of the stand and went with a black satin finish velspar acrylic HD paint for the outside.

I dont know if this will be considered one more mistake on my part but I sealed the stand prior to priming it, but then read that most people first prime the inside and then seal it.


this is after just 1 coat. second coat coming tomorrow

Does anyone know if the order of things make a difference? If it does, would it make sense for me to reseal it over the primer?
 

Sponsor Reefs

We're a FREE website, and we exist because of hobbyists like YOU who help us run this community.

Click here to sponsor $10:


Top