reefiness

Advanced Reefer
Location
Staten Island
Rating - 100%
215   0   0
This is the light strip I'm using.


https://www.amazon.com/gp/product/B01FHEJ6NA/?tag=reefs04-20


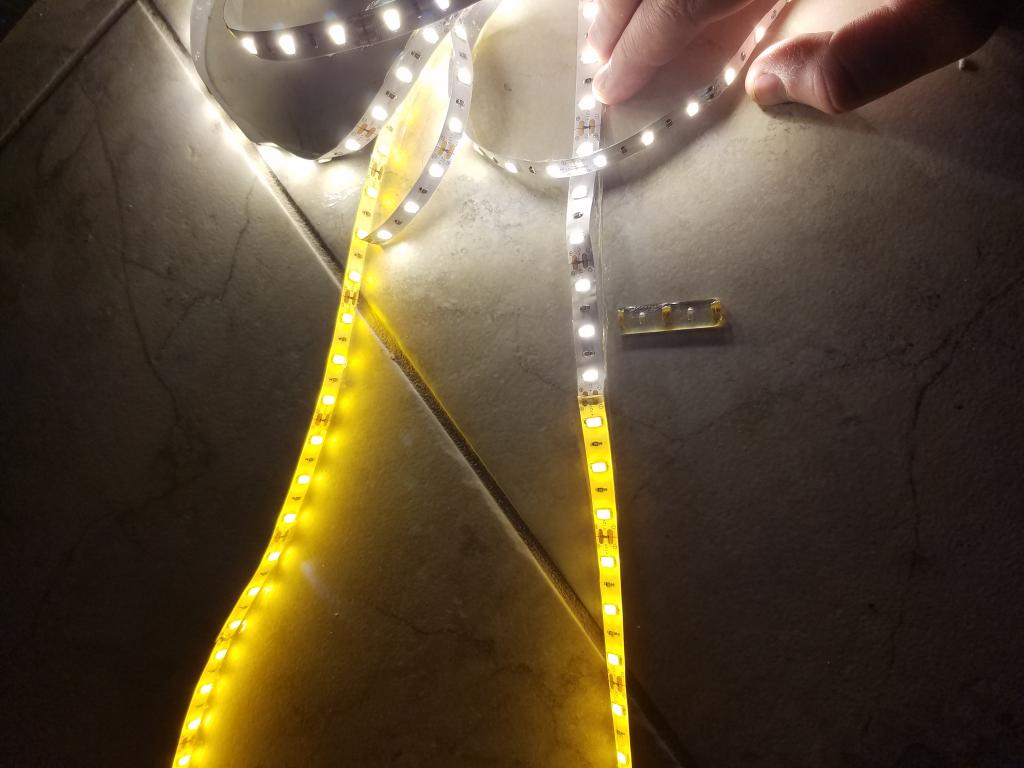
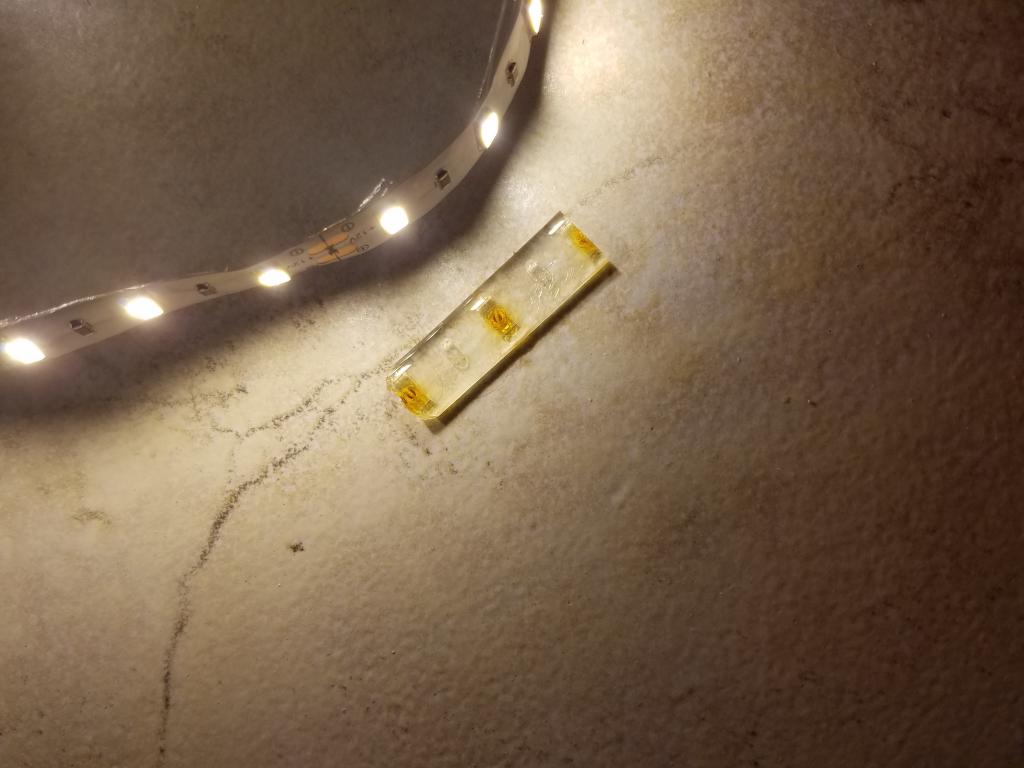
The light strip seems to have burned the water proof coating thats around it right above each diode so when theres actually a tiny little brown/black burn spot infront of each diode that the light needs to travel through now, so its actually more yellow/orange than the 3000k its rated for.

I actually told the company about it (because they emailed me asking how my product was) and I told them what happen, sent them a picture and they sent me a new led strip but i've been too unwrap this one to put on the new strip, so orange lights it is. haha.
 

reefiness

Advanced Reefer
Location
Staten Island
Rating - 100%
215   0   0
Hmm, thought i updated this thread last week. Guess i forgot to click submit.

Anyway, this thread is going to be revived over the next few months as I set up a new system, and with that a slight upgrade for the main tank.

Main tank will be getting a new 40b installed as the sump from a 29g.

New system will be a mushroom and zoa growout lagoon out of a 50g rubbermaid stock tank. Plan is to build it into the stand which will be super oversized (72 long, 48 front to back) And it will also act as a fragging bench for when frag and much needed storage for reef related stuffs underneath. Plan also includes using the old sump from the main tank as the sump for this system. It will have no skimmer, and be solely filtered by bio bricks and quarterly water changes to keep nutrients on the higher side. Will also be lit by 1 250watt MH mouted high enough to cover the 52x31 span of the tank. If that ends up being more light than im aiming for, then I may be switching to 2x AI primes.
 

reefiness

Advanced Reefer
Location
Staten Island
Rating - 100%
215   0   0
So im running into some issues in the planning stage of this build, hopefully i can get some suggestions at the tail end of this older build thread otherwise I may need to start another thread for this. But im looking into plumbing of this tank and originally was planning on using 2 of these 1 inch abs bulkheads I have that are slipxslip. On second thought, figured it may be better to go with the schedule 80 bulkheads on this so i can get a tighter fit being that I dont think the plastic to rubber seal will be as secure as a glass to rubber seal. My problem is finding a schedule 80 bulk head that is a slipxslip fitting. They all seem to be threaded which will be an issue for me as it screws up the plans I had of the rest of the plumbing run because im not sure where to find the pieces i need with threading either.

So anyone know where to get 1 inch schedule 80 bulkheads that are slip x slip.
 

reefiness

Advanced Reefer
Location
Staten Island
Rating - 100%
215   0   0
Looks like i figured it out. Im going to be doing the 3/4" double threaded schedule 80 bulkheads for both inlet and outlet. Inlet will have 3/4" locline on the inside. Outlet will have 3/4" low profile threaded bulkhead strainer on the inside. Both of them will have 3/4" 90 degree male thread to barbed fitting on the outside of the tank. Both lines will then be connected to 3/4" ID braided vinyl tubing to get to and from the sump. Just ordered all the fittings from BRS and a 25ft length of tubing from amazon.
 

reefiness

Advanced Reefer
Location
Staten Island
Rating - 100%
215   0   0
I've spent a bunch of time planning things out and cutting up 2x4s then realizing i didn't get enough wood so having to go out and get some more. Heres what I did yesterday. Was all excited to have a really nice base of the stand under the stand to make storage under there nice and easy. Turns out I was 1" off, ended up splitting the difference and putting 1/2" gap on either side. As of today still haven't fixed that up, but im thinking I may do so. The supports under the ply had 3/4" taken off of them with a table saw so it allows the ply to sit flush with the 2x4s around it.
 

Attachments

  • 20171015_180551.jpg
    20171015_180551.jpg
    80.2 KB · Views: 216
  • 20171015_172421.jpg
    20171015_172421.jpg
    346.2 KB · Views: 210
Last edited:

reefiness

Advanced Reefer
Location
Staten Island
Rating - 100%
215   0   0
Here is today's progress pics. Got some more done. Starting to come together. Just missing some extra cross braces and studs still. Was waiting to have a set spot as to where tank is sitting so I can put the bracing accordingly. Hopefully tomorrow I get to start painting. Still waiting on some parts to come in for BRS so I can re-plumb the main system with the new sump that way I have that old sump available to use on this build.
 

Attachments

  • 20171016_144341.jpg
    20171016_144341.jpg
    249.5 KB · Views: 211
  • 20171016_144439.jpg
    20171016_144439.jpg
    254.8 KB · Views: 211
  • 20171016_144532.jpg
    20171016_144532.jpg
    126 KB · Views: 210

reefiness

Advanced Reefer
Location
Staten Island
Rating - 100%
215   0   0
Traced out where the tank was going to sit and got out the jig saw. Fit on the first try. Tried to error on the side of making the cut out smaller figuring I would always be able to cut off more.
 

Attachments

  • 20171016_145201.jpg
    20171016_145201.jpg
    51.3 KB · Views: 212
  • 20171016_163052.jpg
    20171016_163052.jpg
    116.6 KB · Views: 212
  • 20171016_163059.jpg
    20171016_163059.jpg
    71.1 KB · Views: 211

reefiness

Advanced Reefer
Location
Staten Island
Rating - 100%
215   0   0
Pretty much finished up the last bit of work today. Tomorrow will be painting time. Today I got the left wall cut, added braces where needed on both side walls and the 2x4 across the front, drilled a hole in the top to accommodate the conduit to hang lights off of.

A few minor things left to do is cut out a piece of ply to serve as the base of the sump. I will just use ply flat on the ground for that. Also need to get my hands on a router so I can trim the plywood that will serve to hold up the tank itself. I took the oval like piece i cut out of the top and just dropped it right down on the stand below. Being that the top of the stock tank is bigger than the base, there is a decent amount of excess that I will trim off being that it serves no purpose.
 

Attachments

  • 20171017_145737.jpg
    20171017_145737.jpg
    129.5 KB · Views: 202
  • 20171017_161300.jpg
    20171017_161300.jpg
    103.7 KB · Views: 200

reefiness

Advanced Reefer
Location
Staten Island
Rating - 100%
215   0   0
O right, and also have a desk grommet I purchased to get the light power cords through the plywood. Havent decided if I want that to be the back right corner or front right corner close to the edge of the tank yet. Will also need to secure the conduit with conduit straps when I get this thing into place, get the front black curtain in place, decide whether or not to secure the smaller stand underneath to the main frame or leave it, also need to do the plumbing once i get everything in place, and buy a return pump... then, i should be able to get water into this thing. maybe i shouldnt use the word done just yet.
 

reefiness

Advanced Reefer
Location
Staten Island
Rating - 100%
215   0   0
Thanks! I did a little more the past 2 days. waiting on the pictures to make it from my phone to my computer so I can upload them. Routed the mini stand top, painted everything that needed painting, brought it all inside, and drilled the holes through the tank for plumbing.
 

reefiness

Advanced Reefer
Location
Staten Island
Rating - 100%
215   0   0
Changed out the led lights on my cheato reactor because it started just growing slime algae. Using the red blue grow lights now. The other leds I had which used to be a white had burned the waterproof coating and became a nasty orange color. I peeled some of the coating off and you can really see the difference in color. Also posted a pic of the burn on the water proof coating.
 

Attachments

  • 20171113_223025.jpg
    20171113_223025.jpg
    64.4 KB · Views: 176
  • 20171113_223104.jpg
    20171113_223104.jpg
    61.9 KB · Views: 176
  • 20171113_224417.jpg
    20171113_224417.jpg
    100.7 KB · Views: 172

reefiness

Advanced Reefer
Location
Staten Island
Rating - 100%
215   0   0
Well I came to post some updated pics on my new system as I finally was able to get water flowing, then i realized I never uploading a batch of pictures I thought I did where I had everything painted and assembled in position. I'll look for them to upload otherwise I'll take some new ones as it stands right now. Just added the salt and bacteria today now that I got the water actually flowing rather than just sitting there cold due to plumbing issues.

You can see the new drain vs the size of the old drain which I had to leave in place being that I now have a giant hole there. I ended up plugging the inside of the bulkhead and gluing the plug in place with pvc glue even though it was threaded. I later realized I probably should have just left it in place to use as a back up drain but o well.
 

Attachments

  • 20180313_212356 (1).jpg
    20180313_212356 (1).jpg
    170.4 KB · Views: 152
  • 20180313_212334.jpg
    20180313_212334.jpg
    99 KB · Views: 151
  • 20180313_212341.jpg
    20180313_212341.jpg
    109.4 KB · Views: 150

Sponsor Reefs

We're a FREE website, and we exist because of hobbyists like YOU who help us run this community.

Click here to sponsor $10:


Top