aaron

Australian
Location
Sydney
Rating - 100%
16   0   0
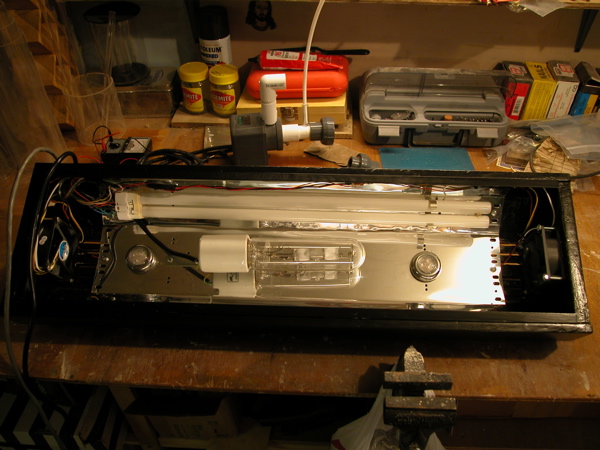
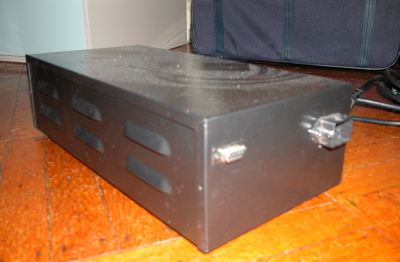
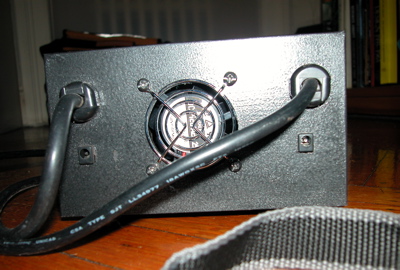
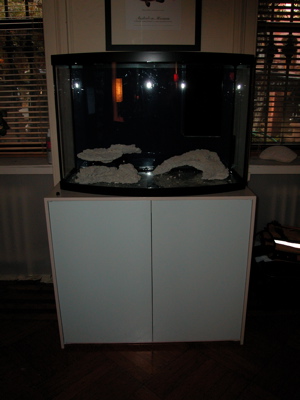
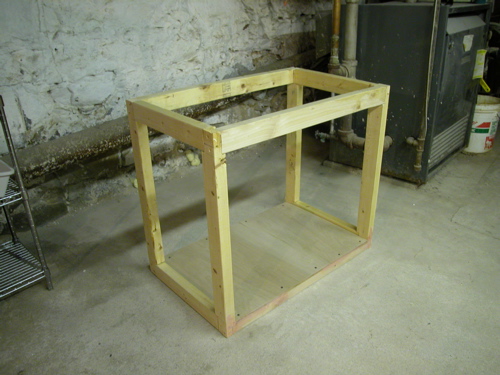
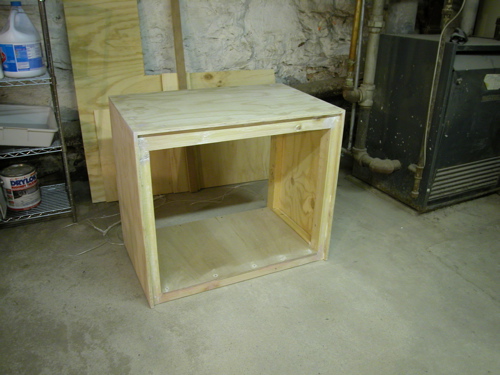
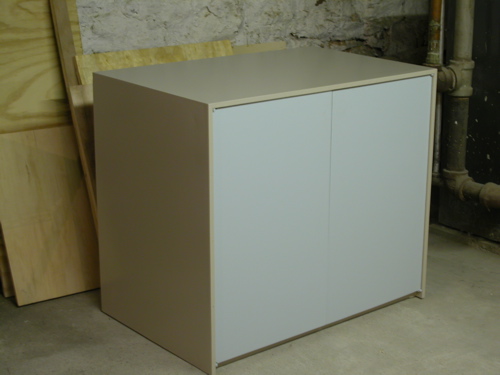
Well, after a million questions posted on this board i am ready to embark on what i am hoping will be the second last tank of my life. I am attempting to do two things that are often considered mutually exclusive - to make the best possible, most maintenance free tank and to make it the cheapest possible tank to setup. To achieve this I will be trying to DIY everything with the exception of the tank itself and the pumps.
I will also be doing something that no one on this site would ever do - I will post a running total of how much i have spent! in other words i will admit how much i have spent (just dont show this thread to my wife)
Pictures to follow very soon
 

aaron

Australian
Location
Sydney
Rating - 100%
16   0   0
First up the DIY stand.
I made this from some salvaged 2x3" wood i found on the street and some plywood i "found" on a building site down the road.
Total cost of the stand $60.00 for hinges screws and paint.
 

Attachments

  • dscn00020ty.jpg
    dscn00020ty.jpg
    83.6 KB · Views: 624
  • dscn00140lg.jpg
    dscn00140lg.jpg
    76.6 KB · Views: 616
  • finished1si.jpg
    finished1si.jpg
    45.7 KB · Views: 604

jhale

ReefsMagazine!
Location
G.V NYC
Rating - 100%
52   0   0
if your keeping a running total, will this include just tank parts or will it be dry goods and livestock as well.

your a much braver man than I ;)
 

VJ&POOPS

Member-MR Best Reef Site
Rating - 100%
83   0   0
You found those wood in your neighborhood, nice neighborhood (those are new wood, I wish I could find those in my neighborhood)...I'd be very very carefull with using 2x3 for a stand (36 g w/ water is pretty heavy). The stand is looking good though.....good luck...
 

aaron

Australian
Location
Sydney
Rating - 100%
16   0   0
John, just tank parts at the moment. Maybe some other bits and pieces, but probably not livestock.

The wood for the stand came from an old bed thrown out in Carol gardens.
2x3 is plenty thick enough for the stand, once it is screwed to the plywood.
 

jhale

ReefsMagazine!
Location
G.V NYC
Rating - 100%
52   0   0
the plywood alone is strong enough if constructed correctly.
people often underestimate the strength of plywood, it's really strong.
just don't nail and glue, screw and glue :)
 

aaron

Australian
Location
Sydney
Rating - 100%
16   0   0
Here's the DIY light pendant, It has quick disconnect cords, 1 x 175W MH, 1x 55w CF actinic and two moonlights. The ballasts are in a metal box with fans. pictures of that next week
I build the lights in a pendant style to avoid the heat buildup in an enclosed hood. Also I dont like the proportions of a big hood on a smaller tank.
Cost of these lights:
MH ballast and parts : $70
Reflector and CF bulb: $40
Moonlights: $8
Assorted electrical stuff : $12
Fans: MR freebie (thanks jhale)


Total for lights - $ 130
 

Attachments

  • DSCN0034.jpg
    DSCN0034.jpg
    150.3 KB · Views: 391
  • DSCN0035.jpg
    DSCN0035.jpg
    120.4 KB · Views: 387
Last edited:

inline6

Advanced Reefer
Location
Queens, NY
Rating - 100%
29   0   0
Looks Good.
How do you paln on resting it on top of the tank?

Let me know how your lights work out with the cross brace on the 36g blocking some of the light.

Am interested in possibly setting one up in the future.
 

aaron

Australian
Location
Sydney
Rating - 100%
16   0   0
I'm going to use some legs made for a coralife fixture and if that turnes out to be not successful i will hang it from the ceiling.
As for the brace, i'm not sure how that's going to work out but I'll keep you posted.

EDIT
Turned out to be totally unsuccessful, i'm having to construct an open top hood to rest the lights on and to block the extra light from spilling into the room.
 
Last edited:

aaron

Australian
Location
Sydney
Rating - 100%
16   0   0
Well it was quite a productive weekend, I managed to make the overflow box and stated to assemble the DIY skimmer. Next weekend its starboard and plumbing time.
I'll post some pictures of this weeks work as soon as i can reclaim my living room from the friends that are camped out there.
 
Location
Howell, NJ
Rating - 100%
64   0   0
aaron we should talk some time.. im actually thinking about doing my new 75 gallon tank pretty much diy and u no what you are doing. im looking to make my own overflow and skimmer maybe you can help me out it would be greatly appreciated man. let me no... i also own a pizzeria in bk were im there once in a while in bensonhurst so hopefully ill talk to you soon..
 

aaron

Australian
Location
Sydney
Rating - 100%
16   0   0
Gil716, The pendant is just 3/4" ply ends and the bulk of it is 1/2" ply held together with finishing nails, glue and a lot of epoxy filler. I painted it will two coats of oil based primer and then finished it with 2 coats of oil based heat proof enamel.
The reflector is a standard reflector from hellolights that i had to bend to fit
I routed the 1/4" vent holes in the top to help get the heat out of the pendant.
Here are a couple of pictures of the ballast box with the quick disconnects and fan ventilation
 

Attachments

  • DSCN0036.jpg
    DSCN0036.jpg
    41.8 KB · Views: 330
  • DSCN0037.jpg
    DSCN0037.jpg
    55.4 KB · Views: 332

aaron

Australian
Location
Sydney
Rating - 100%
16   0   0
Tony, the overflow is pretty easy, just a matter of making up a jig to rout the teeth for the overflow. Skimmers are a little more difficult, the design is quite critical and there are a lot of other people on this site with more expertise than me. I have made quite a few dud skimmers so far, I am hoping this one will work out.

Here is a picture of the tank with the vinyl background stuck to the backglass and the overflow box in place. I also have some pieces of homemade live rock in the tank.
 

Attachments

  • DSCN0038.jpg
    DSCN0038.jpg
    37.8 KB · Views: 500
Last edited:

Sponsor Reefs

We're a FREE website, and we exist because of hobbyists like YOU who help us run this community.

Click here to sponsor $10:


Top