


You are using an out of date browser. It may not display this or other websites correctly.
You should upgrade or use an alternative browser.
You should upgrade or use an alternative browser.
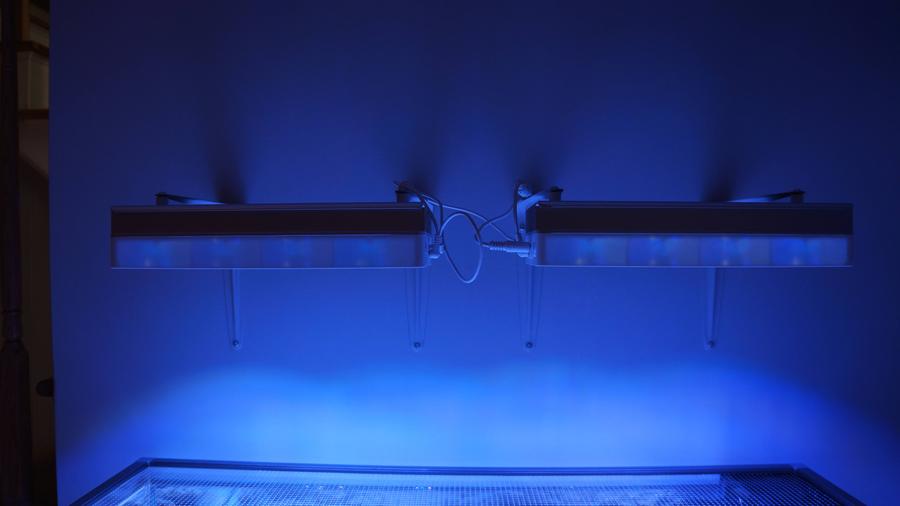
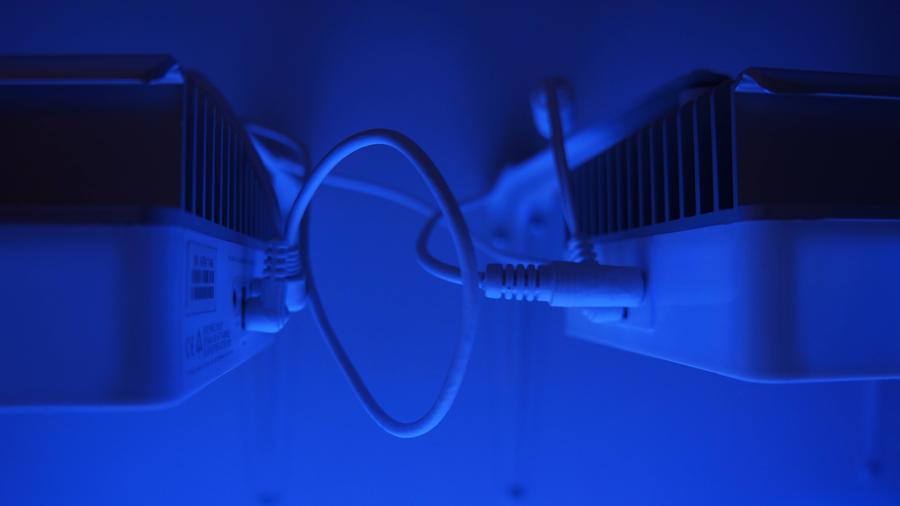
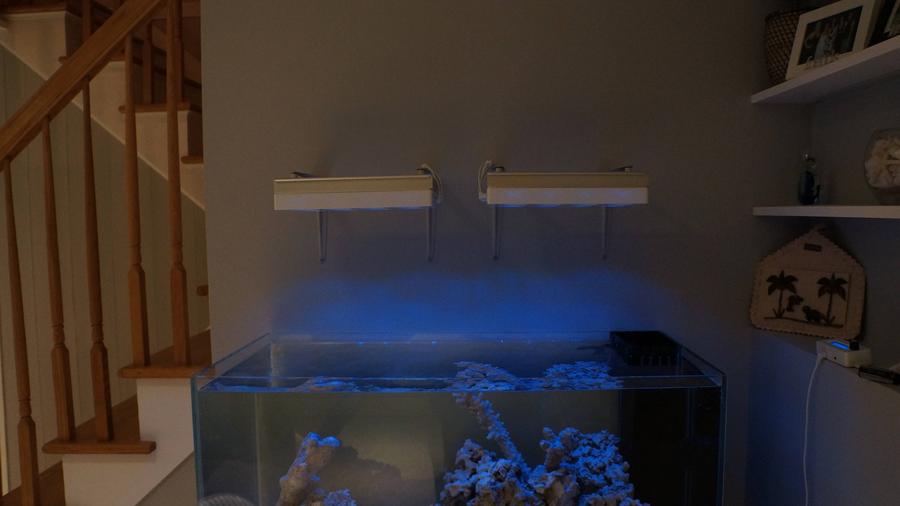
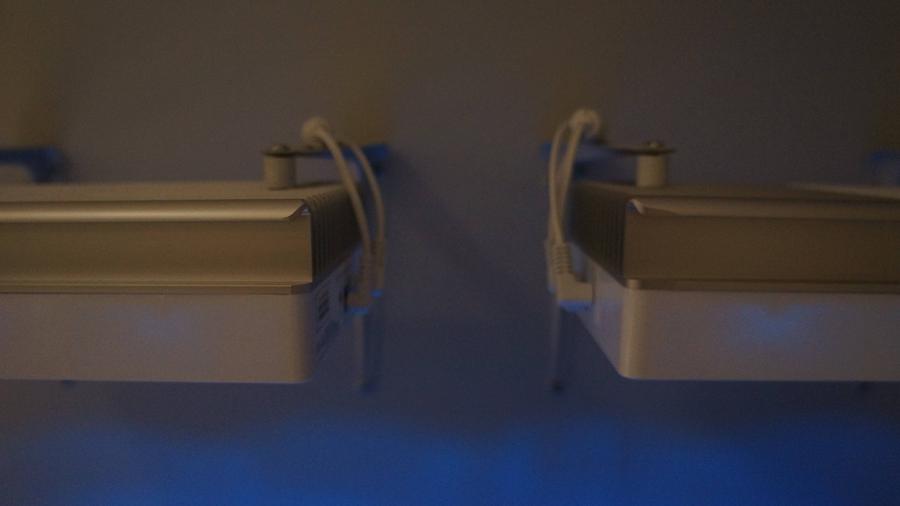
Custom Look CadLights 50Long
- Thread starter twan
- Start date
- Location
- Queens/Flushing/Whitestone/NYC
Very nice and neat mounting and hiding of all the wires. I hope i can do that too, before my wife freaks out on making holes in the wall since the wall is brand new and will be put up in a week or two to separate my office.....lol! Very nice progress, wish my tank is here already, been felling like forever. Keep the progress going : )
I have a plumbing problem so let me post here.
Details:
My return pump is an Eheim 1260. The pipe is 3/4" has 1 ball valve on it, two 45 deg elbows, then goes to a 1/2" reducer right before the bulkhead.
My drain is pipe is 1" has 1 ball valve on it, two 45 deg elbows, then goes to a 90 degree elbow right into the sump inlet that terminates about 2 inches below the sump water level.1/2" reducer ri2 45 d
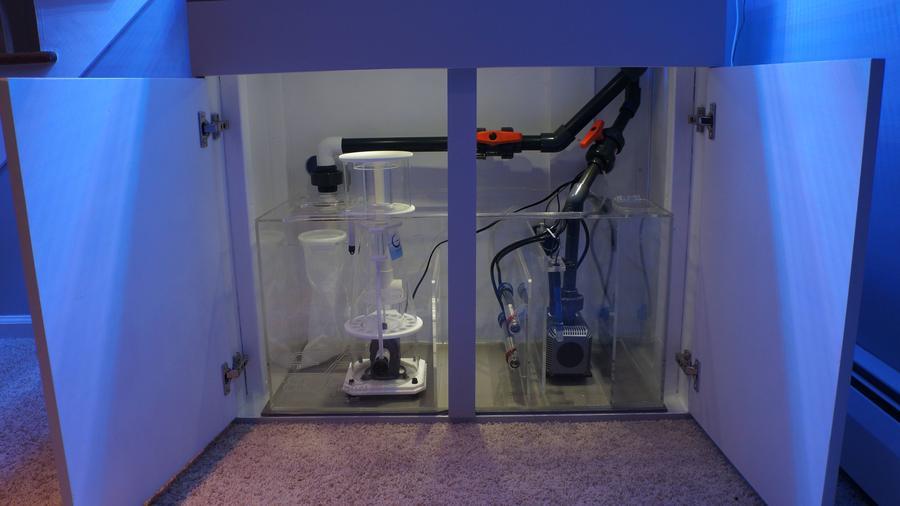
Sump Picture:
Issue:
The problem is to maintain proper height in the overflow (1 inch or so below water line) I need to dial back my return. Not a lot but 20% I would say.
If I do not do this the overflow box water height falls to right at the durso intake, makes lots of noise, and I get sloshing in the return section of the sump.
I know dialing back a return is a no-no. If something gets into an already restricted pipe and clogs it, I will have a flood.
Fixes?:
A.) I thought about dialing back the return or maybe splitting the return and routing some of it off thinking if I pumped less in then less would drain but that did not work.
B.) I cannot change the return plumbing pipe size because I would still need to reduce to 1/2" at the bulkhead.
C.) I ordered a gate valve to place on the drain just after the ball valve so I can run the ball valve as an emergency shutoff only and keep it wide open.
The gate valve will still have me restricting flow on the drain but will allow me more precise control. This is a temporary fix.
D.) If I was to upgrade to a Eheim 1262 would this even fix my problem? I have 3/4" below the bulkhead and 1/2" from the bulkhead up. I think my pipe is already restricting my pump. I dont want to waste money on a larger pump and be in the same boat.
E.) Reduce the size of my return plumbing from 1" to 3/4"?
F.) I also noticed something else. My MP10 is pointed from the overflow corner to the opposite side of the tank.I have had it in constant mode, very low for now. When I kick up the pump, more water movement means the water level in the overflow drops even more!
I need a plumbing 101 course to understand why this is all happening. For now I am blaming the small diameter return or the design/footprint/teeth spacing and depth of the overflow.
Details:
My return pump is an Eheim 1260. The pipe is 3/4" has 1 ball valve on it, two 45 deg elbows, then goes to a 1/2" reducer right before the bulkhead.
My drain is pipe is 1" has 1 ball valve on it, two 45 deg elbows, then goes to a 90 degree elbow right into the sump inlet that terminates about 2 inches below the sump water level.1/2" reducer ri2 45 d
Sump Picture:
Issue:
The problem is to maintain proper height in the overflow (1 inch or so below water line) I need to dial back my return. Not a lot but 20% I would say.
If I do not do this the overflow box water height falls to right at the durso intake, makes lots of noise, and I get sloshing in the return section of the sump.
I know dialing back a return is a no-no. If something gets into an already restricted pipe and clogs it, I will have a flood.
Fixes?:
A.) I thought about dialing back the return or maybe splitting the return and routing some of it off thinking if I pumped less in then less would drain but that did not work.
B.) I cannot change the return plumbing pipe size because I would still need to reduce to 1/2" at the bulkhead.
C.) I ordered a gate valve to place on the drain just after the ball valve so I can run the ball valve as an emergency shutoff only and keep it wide open.
The gate valve will still have me restricting flow on the drain but will allow me more precise control. This is a temporary fix.
D.) If I was to upgrade to a Eheim 1262 would this even fix my problem? I have 3/4" below the bulkhead and 1/2" from the bulkhead up. I think my pipe is already restricting my pump. I dont want to waste money on a larger pump and be in the same boat.
E.) Reduce the size of my return plumbing from 1" to 3/4"?
F.) I also noticed something else. My MP10 is pointed from the overflow corner to the opposite side of the tank.I have had it in constant mode, very low for now. When I kick up the pump, more water movement means the water level in the overflow drops even more!
I need a plumbing 101 course to understand why this is all happening. For now I am blaming the small diameter return or the design/footprint/teeth spacing and depth of the overflow.
Ok I made some "progress" last night. The reason why I was not able to just open the drain full and dial back the return was because I had too much water in the system.
I drained out 2 gallons approx, was able to open my drain fully then dial back the return.
This had the following consequences now:
When I tee off the return that will alleviate the vibration. I tried cutting and using higher standpipes attached to the durso and it had no effect.
The other issues are how this should be operating and I just have to get used to it?
I drained out 2 gallons approx, was able to open my drain fully then dial back the return.
This had the following consequences now:
- My Eheim 1260 is dialed back to only letting 25% through and vibrates, I plan to T this off and have another valve on the T to divert some back into the return chamber to solve.
- The flow exiting through the return is so small you can barely feel it.
- The flow through the sump has slowed way down and I now have to adjust the skimmer.
- The water level in the display has dropped to almost 1.5" lower then the lip.
- The water level in the overflow box does not gush in anymore it comes over the wall and just dribbles down to the water level that is now just barely above the where the strainer pulls in versus how it used to be which was very high and almost to the top of the hole drilled into the top of the durso.
When I tee off the return that will alleviate the vibration. I tried cutting and using higher standpipes attached to the durso and it had no effect.
The other issues are how this should be operating and I just have to get used to it?
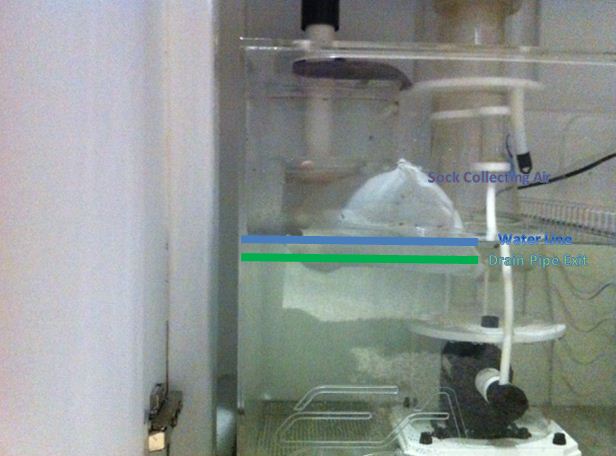
OK lets take another approach.
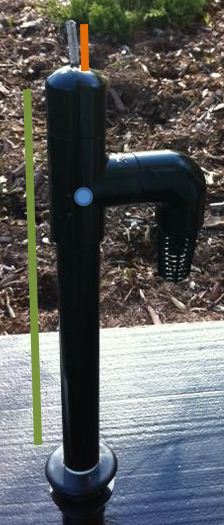
- The blue circle is a hole through my standpipe from CAD lights that goes through both sides. Should I not use this pipe because of the hole, what was its intended design?
- The green line represents the water level in the overflow box, where should it be on the standpipe?
- The orange line represents the airline, how far should this go down the pipe leaving how much sticking out the top?
I had to give up on the plumbing and dial my drain back and leave it like that for now.
Way tooo frustrating. I'll revist this another day.
My Tunze ATo head unit went back to Tunze USA for them to replace. I have not gotten a new one back yet.
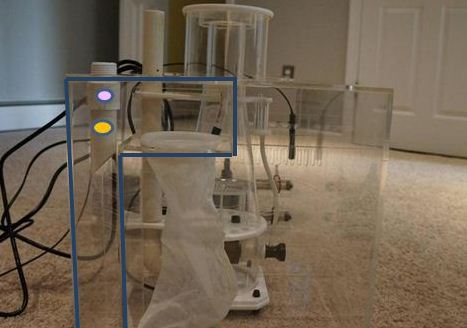
Now my cadlights TIA1150 skimmer has been pulling good stuff.........but i see now where the collection cup slips into the neck there must be a leak. There is yellow water (skimmed) sitting on the bracket below the neck and dripping back into my sump. I removed and cleaned the cut and re-seated it down evenlu y a few times.............come back a few hours later, same deal.
**** comes in 3's huh
Way tooo frustrating. I'll revist this another day.
My Tunze ATo head unit went back to Tunze USA for them to replace. I have not gotten a new one back yet.
Now my cadlights TIA1150 skimmer has been pulling good stuff.........but i see now where the collection cup slips into the neck there must be a leak. There is yellow water (skimmed) sitting on the bracket below the neck and dripping back into my sump. I removed and cleaned the cut and re-seated it down evenlu y a few times.............come back a few hours later, same deal.
**** comes in 3's huh
Skimmer:
I cleaned and reseated the skimmer collection cup and will take a picture next time it leaks.
Durso:
The more people I talk to the more they tell me to ditch the CAD durso and go with one that has 1.25" standpipe like the guy who makes them here:
http://shop.dursostandpipes.com/index.php?main_page=product_info&cPath=1_7&products_id=10
PVC Size to Use
My tank has a 1 inch bulkhead on the bottom glass where the water drains out. For this size hole, I recommend you use 1? inch Schedule 26 PVC for the standpipe. I do not recommend 1? inch PVC as the larger fittings are much harder to fit inside overflow chamber (also called a weir). Secondly, there is no advantage in 1? inch over 1? inch PVC when dealing with a 1 inch bulkhead ? the bulkhead is the limiting factor for the amount of water that can drain out.
To Oversize or Not to Oversize
With 1 inch and smaller bulkheads the standpipe's PVC diameter needs to be larger than the bulkhead to work correctly. I get a lot of e-mail questions on why this is. Honestly, I?m not sure. Typically if you use 1 inch PVC pipe on a 1 inch bulkhead you get poor results. (Some exceptions with smaller low flow tanks.) Take my word on it and use 1? inch PVC pipe
So here is the deal with the skimmer. It leaks between the collection cup and the skimmer neck.
The sealant used there seems to me marred in some way. I took the collection cup on and off several times to make sure that it was seated correctly.
Should I remove the collection cup, add a bead of silicone to it and let it dry before resetting it down?
Also in how much height of water should this skimmer be?
Pics here:
http://www.nano-reef.com/forums/index.php?showtopic=293334&st=320&gopid=3841623&#entry3841623
Skimmer Collection Cup Vid #1:
http://www.youtube.com/watch?v=iBoSeP5IpTg
Skimmer Collection Cup Vid #2:
http://www.youtube.com/watch?v=9XkVhNdAvXI
http://www.youtube.com/watch?v=iBoSeP5IpTg
Skimmer Collection Cup Vid #2:
http://www.youtube.com/watch?v=9XkVhNdAvXI
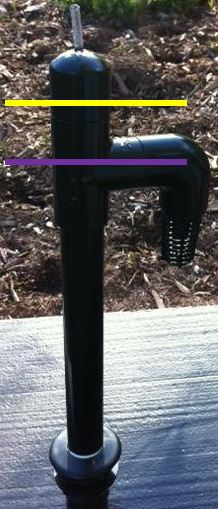
Even after I switch out my durso I think I have to quiet the sump inlet a lot if I want to run this thing wide open. Would you remove this fitting and its pipe and start trying different lengths?
I tried removing the fitting and pipe but it would not budge.
Here is a better picture marking the pipe and fitting and the outer dimensions of the chamber to show how small of an area is is that then overflows into the filter sock. This whole thing is now in the left rear of my stand now btw.
I tried removing the fitting and pipe but it would not budge.
Here is a better picture marking the pipe and fitting and the outer dimensions of the chamber to show how small of an area is is that then overflows into the filter sock. This whole thing is now in the left rear of my stand now btw.
So this picture shows my sump inlet that then overflow into the filter sock.
I could not remove this fitting so I now run my drain line open 100% into the filter sock directly like this:
My question is I cut the drain pipe that enters the water at an angle to let air escape.
It quieted it down some but not as much as I would like. See how my filter sock is catching all that air?
Should it not be like that? Should the sock be fully emersed in the water? Should I have a straight cut at the bottom instead of an angle and put a 45deg or 90deg bend fitting on the bottom pointed towards the rear to quiet it?
Its the way I have to run it now until I can dry a different durso. Putting a valve on the airline in the cap of my current durso causes constant flushing. Airline in with no valve gives me the proper height and lets me open the drain 100% but I still have sloshing and lots of air/bubbles in the sump inlet. Lesser of 2 evils till I can test the http://www.dursostandpipes.com/
I heard back from Tunze on my ATO issue:
Apparently it was a switching defect in the controller itself. I should have it back Friday.
I verified your power supply worked and I tried changing the wire on the controller and it was a no go. I replaced the controller with a brand new one in the sealed factory packaging.
Apparently it was a switching defect in the controller itself. I should have it back Friday.
Hold on everyone. I promise there will be livestock soon!~
My wife is being induced tonight since our 1st child (boy) is 1 week overdue.
The rest of the week will be re-adjusting to our new addition and maybe next week I will have time to reinstall the ATO, Durso, Apex WMX Unit.
I picked quality components and have just had bad luck.
Tank - CAD wrong silicone color, delay in getting another tank that delayed the stand build.
ATO - Tunze, manufactoring defect, delay adding livestock.
Skimmer - CAD, bad cup seal, delay adding livestock.
Durso - CAD Durso sucks and is being replaced by another, delay adding livestock.
Plumbing - My fault for not ordering enough SCH80 fittings in my 1st BRS order, delay adding livestock.
See the pattern? Delay delay.............delay! Hang tight!
- Location
- New Jersey
Hold on everyone. I promise there will be livestock soon!~
My wife is being induced tonight since our 1st child (boy) is 1 week overdue.
The rest of the week will be re-adjusting to our new addition and maybe next week I will have time to reinstall the ATO, Durso, Apex WMX Unit.
I picked quality components and have just had bad luck.
Tank - CAD wrong silicone color, delay in getting another tank that delayed the stand build.
ATO - Tunze, manufactoring defect, delay adding livestock.
Skimmer - CAD, bad cup seal, delay adding livestock.
Durso - CAD Durso sucks and is being replaced by another, delay adding livestock.
Plumbing - My fault for not ordering enough SCH80 fittings in my 1st BRS order, delay adding livestock.
See the pattern? Delay delay.............delay! Hang tight!
Twan congrats on the new addition man god bless your newborn bro ^_^
- Location
- Queens/Flushing/Whitestone/NYC
Hold on everyone. I promise there will be livestock soon!~
My wife is being induced tonight since our 1st child (boy) is 1 week overdue.
The rest of the week will be re-adjusting to our new addition and maybe next week I will have time to reinstall the ATO, Durso, Apex WMX Unit.
Damn, your good, you still have so much time in your hand to work on the tank. I envy you. I barely even have time to do my crap.
Hope everything goes well for you man and your wife and congrat!!!!
Sponsor Reefs
We're a FREE website, and we exist because of hobbyists like YOU who help us run this community.
Click here to sponsor $10:
