tosiek

Senior Member
Rating - 100%
48   0   0
Some quick crappy pics of the glass temp installed. ill get detailed pics of the rim for the glass and the hood without the shell tommorrow.

IMG_0250.jpg


IMG_0252.jpg
 

marrone

The All Powerful OZ
Staff member
Location
The Big City
Rating - 98.8%
80   1   0
Tony

The doors on the stand seem seamless, are they going to have handles or just push open?

As for the lighting, there was a person on RC that had a setup with different lighting condition over the tank, for different types of corals. I think it may even have been a TOTM. His tank was pretty large and he actually had some of the bulbs,T-5 or VHO, set diagonally over the tank.
 

tosiek

Senior Member
Rating - 100%
48   0   0
Yeah, the doors look too nice this way to add any hardware to the faces. I was planning on adding pulls to the tops of the doors so you only see this minorly intrusive brushed nickle lip

yhst-64577158608528_2019_81


but i think im going to go with spring loaded magnetic door stops and be creative with the edge pulls so you don't see them at all. Ill show pics once its done as its hard to explain without sketching. Rusting has been playing a major part in the hardware used. So, as with everything all the hardware im using i have spares to switch out when they stop working smoothly. The european hinges usually rust up every 6 months in my bottom cabinet now. My old hood piano hinge rusted up in 3 months in my current hood. Its amazing how quick the humidity gets to these things and i have a very well vented stand/hood right now.

My original plan for the hood was to get an auto lift system for the top, and run a long 4 ft door that opened with milked plexy/glass and rust quickly made me think twice.

As far as the lighting goes i ordered 2 SE lumenarc mini sets, and have 2 sets of 24" T5 retro's sitting and waiting. I was going to play with bulb colors on the tank once i have it set up and running which is the major problem when doing a changing light pattern over a tank. Its real hard to get the T5's to pop the colors like the MH's do and to match the right K spectrum between the T5's and the MH's. Right now from what ive played with over my short tank, its like looking at 2 different tanks unless i go with 20k's and super actinic the complete tank. You really see the difference between the 10k/actinic T5 set and the MH 14k bulbs. And i don't like the 10k look in MH but im sure you would still see a difference.
 

tosiek

Senior Member
Rating - 100%
48   0   0
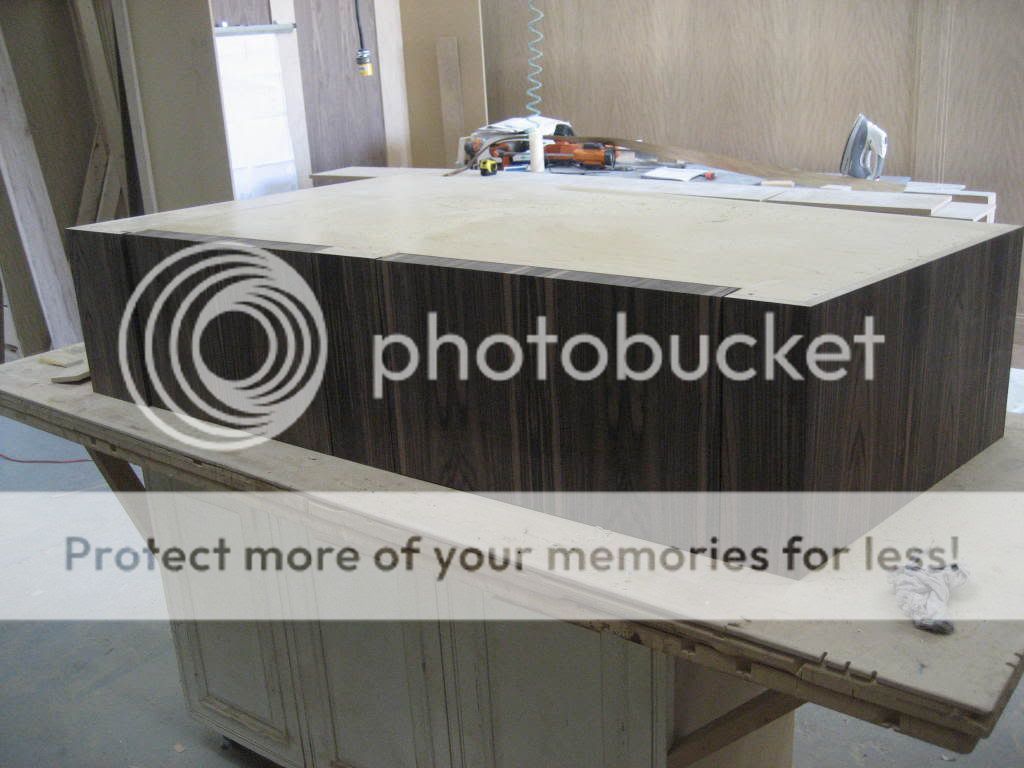
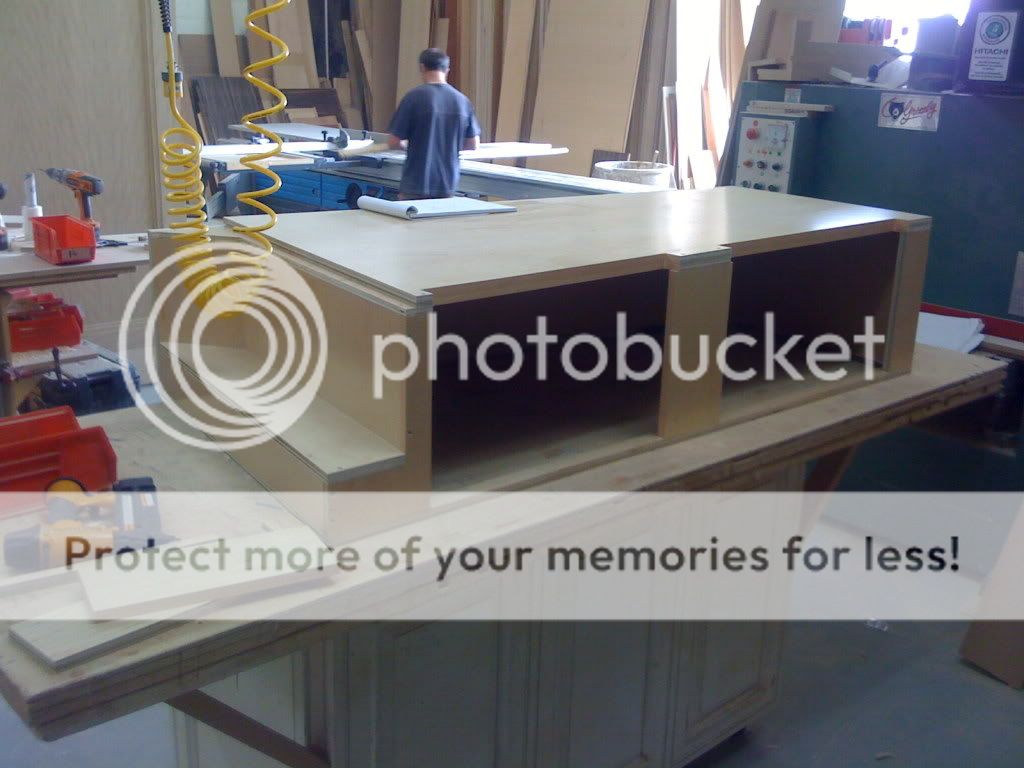
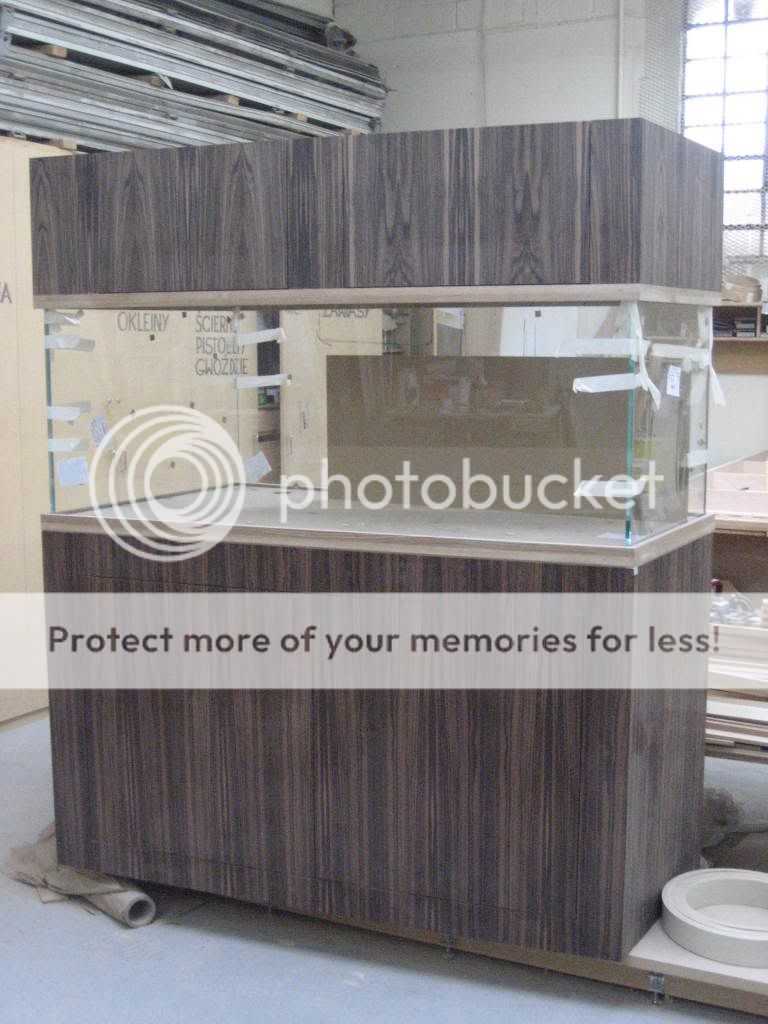
Long past due hood pics. Just finished it up today pretty much. Its built the same way as the stand, with a ply skeleton and a veneered mdf shell. Lemme know if somethings wrong, or im missing things. I had alot on my mind during this and had to rush the design a little. As well as slight problems with other things.

Wright015.jpg


I half worked on this and the rest was finished up by one of my workers who did an amazing job with panel matching (had some problems with lack of enough material the correct sizes) and putting the finishing touches on.

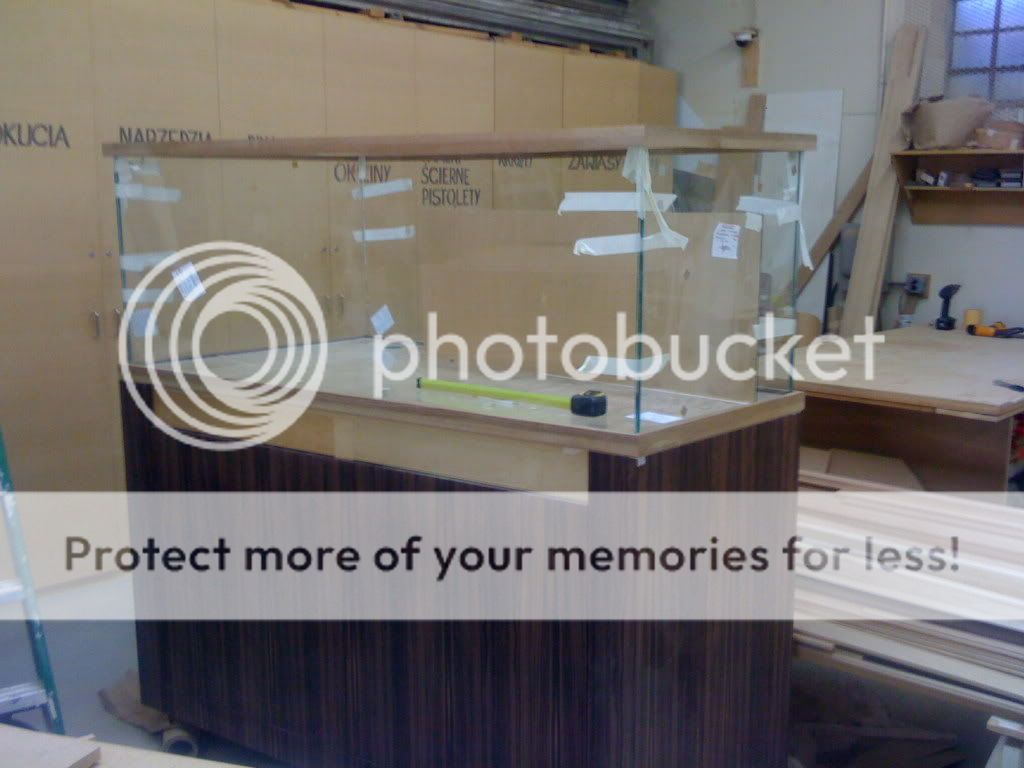
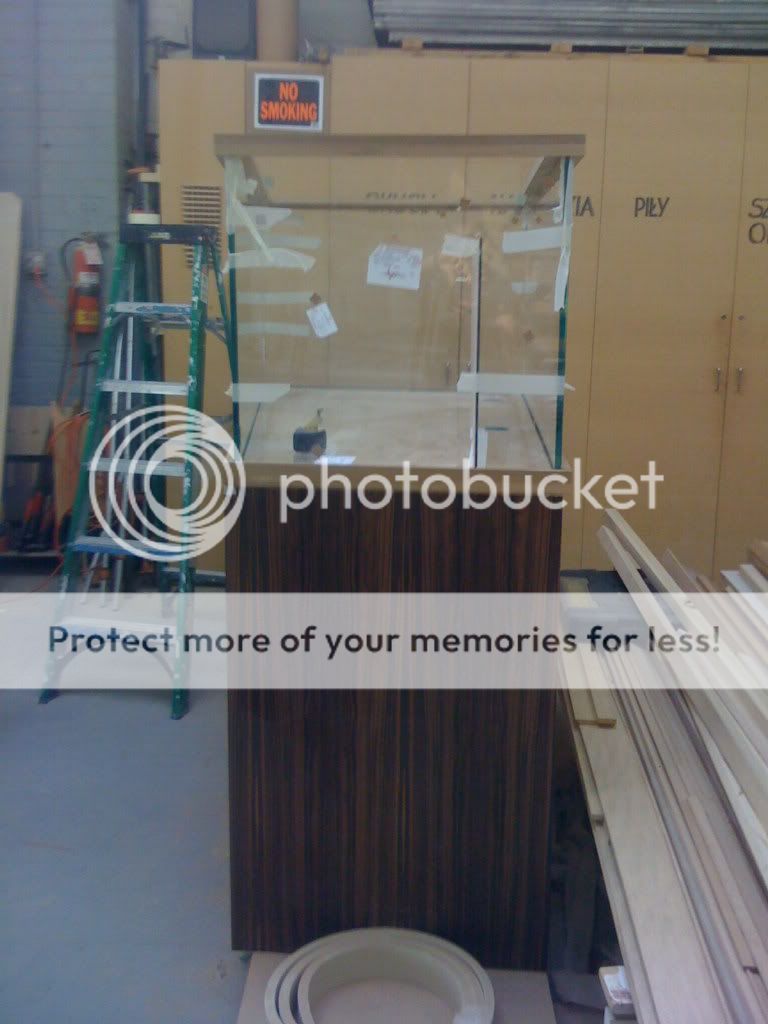
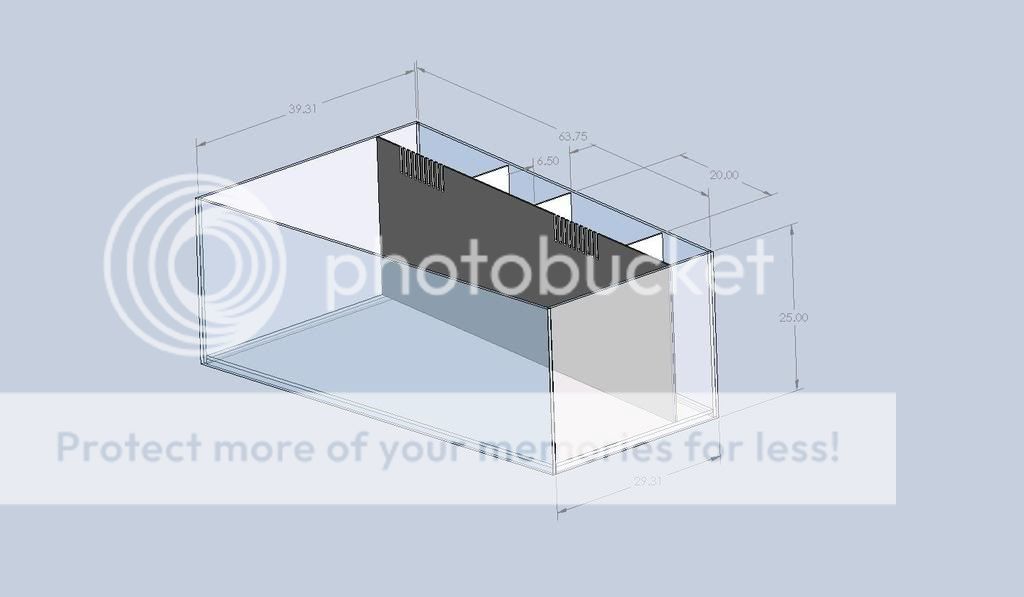
The hood measures 15" high for the outside dimension. That gives me enough room inside to adjust the MH heights and gives me the amount of lighting I want with the depth of the tank. The top of the hood will stay as is. The complete tank stands at roughly 82-84 inches, and i will never see the top. Plus, i ran out of material and its not cheap.

tank001-1.jpg


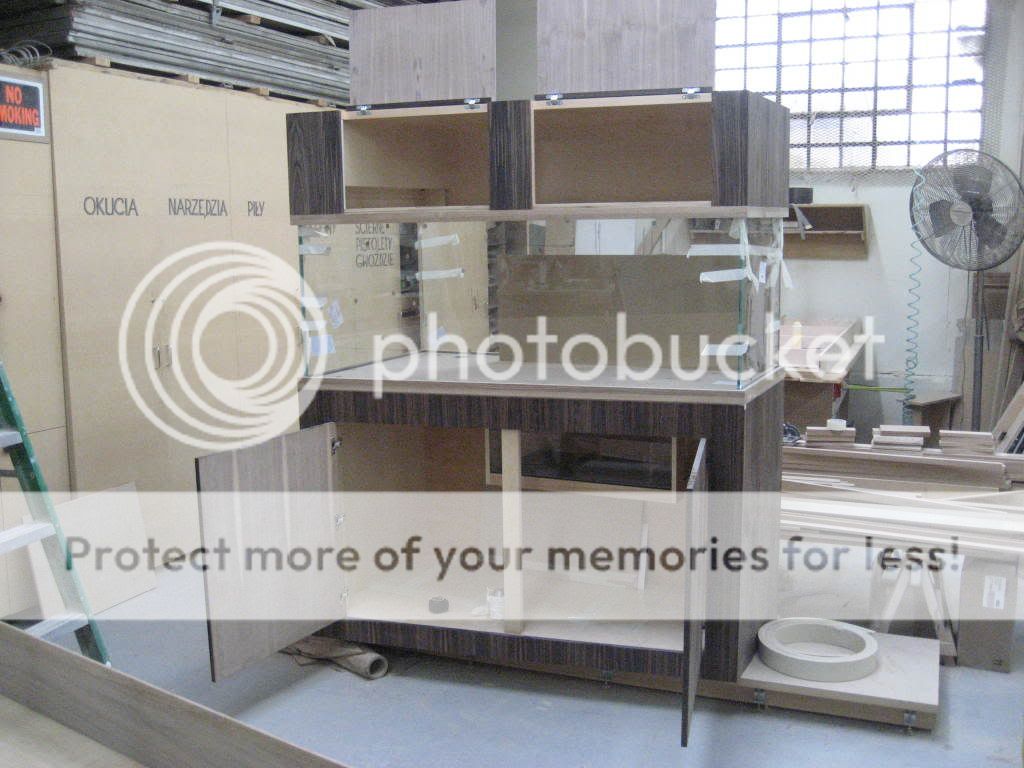
The skeleton and you can see the area for the bulk of my electrical work. The area will be vented with fans into the hood itself (still desciding, might go into the back and out as to not transfer extra heat into the hood) on the slanted piece on the back. As far as venting for the hood as a whole, im still working on the intake, but the exhaust fans will be on the right side of the hood behind a brass grill once i find one laying around that fits. 3x 120mm PC fans i think im going to use for the hood, and i can fit 1-2 80mm PM fans for the electric compartment.

Wright019.jpg


Inside of the electrical compartment is flat on the inside of the hood, with an added piece for the angled end. Done for structure and because i didn't have time to go that extra mile of wierd cuts and aligning. Now that im looking back at it, the angled piece turns useless, and really has no purpose if im going to vent it behind the hood.

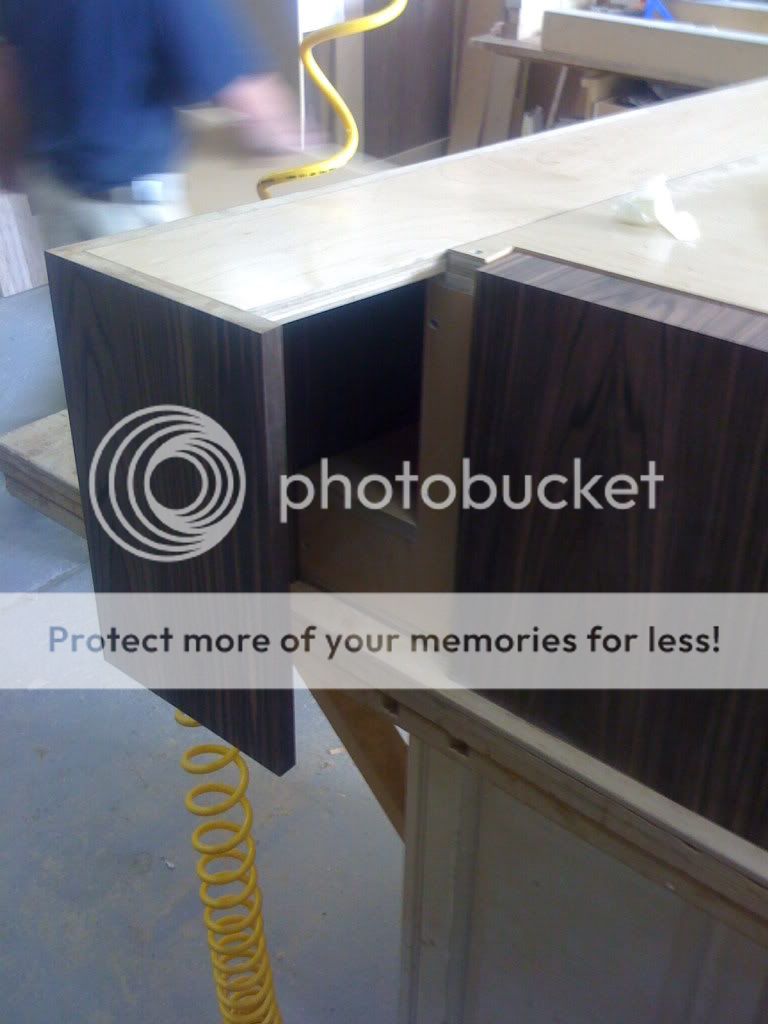
Btw, the front pieces of ply spanning the doors on the bottom will be cut out and removed. They are there to add some structure and alignment/spacing during the build process.

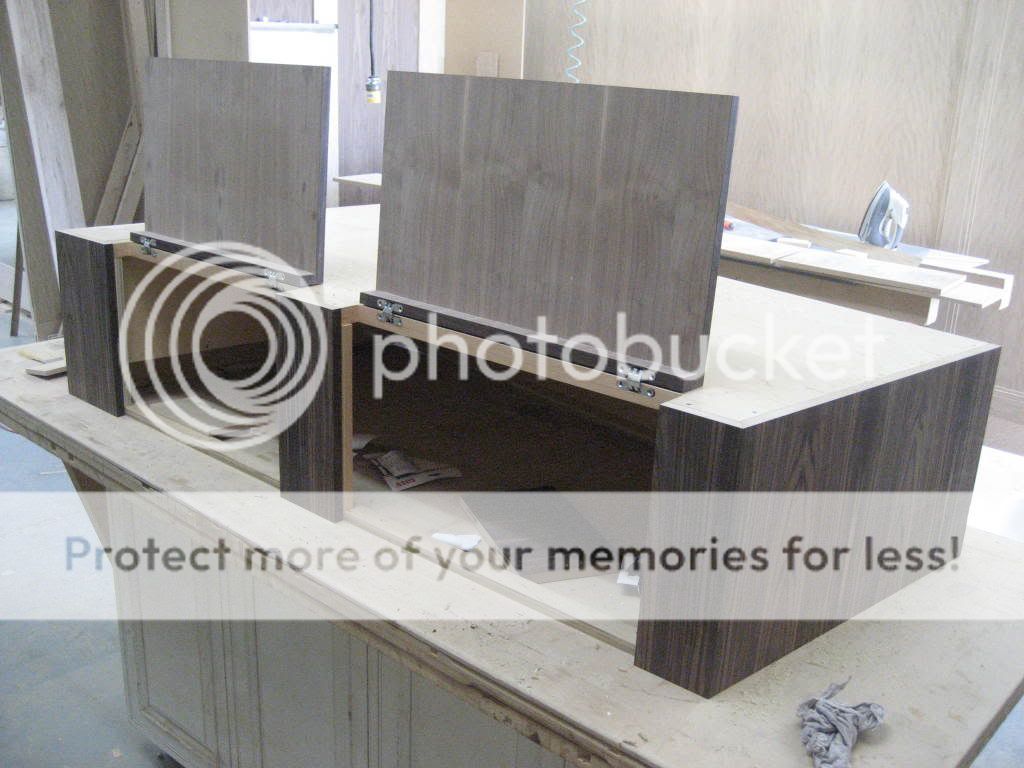
Pics on the panel going over the electric. Im going to install guides for the corner that is removable as ill open it rarely and don't need a fancy hinge. The whole side slides out, and was done to reduce break lines in the corner and side of the hood if i made it just enough to cover it. if that makes sense.

tank007.jpg


Doors are set on Soss invisible hinges and im still deciding on using those magentic spring push latches and where they will be mounted and if they will work correctly.

Wright021.jpg


I took an easy way out as far as the hood sits on the tank rim due to a screw up when making the rim molding. So as it stands currently, ill be just placing the hood on the top rim, which has a flat surface, and tapping/screwing into the rim itself in 5-6 places then secure the hood with nylon screws. I made a 1" lip on the inside of the hood to allow that. Ill take off the hood maybe 2x a year max, and would need 2 people. So, its fine and i could deal with this descision. Ill be routing out part of the rim under the doors to provide a water catch when doing things inside the tank so water doesn't get between the hood and tank as much.

Think thats it for now. Lemme know your thoughts and ideas. Anything is helpful and stuff still can be changed within reason. :tub:

Wright015.jpg
 

tosiek

Senior Member
Rating - 100%
48   0   0
Forgot to mention, The rims i made are solid oak and not ebony (solid ebony costs an arm and a leg and its ugly) And im having a problem finding and matching veneer to cover the visible sides that i could get 3 leaves of. So, i have to get lucky or faux paint it in. Again, more problems i have to deal with. Arg. :irked:
 

cali_reef

Fish and Coral Killer
Rating - 97.3%
36   1   0
Its amazing how quick the humidity gets to these things and i have a very well vented stand/hood right now.


I am planning on using HD valcro and not use any exposed metal hardware in the stand and canopy.

How heavy is that canopy?

Make sure you seal all the open plywood edges in the canopy..

It looks AWESOME!!
 
Last edited:

bad coffee

Inept at life.
Rating - 100%
27   0   0
Looks good T.

Have you thought about just using magnets to hold the doors closed? gravity should do most of the work, so you'll only have to keep the doors flush. How about drilling out a small recess in the side of the door and putting a rare earth magnet in both the frame and door. Fill with dark epoxy and no worries about rust.

B
 

tosiek

Senior Member
Rating - 100%
48   0   0
they stay closed fine with gravity and flush, its opening them that turns into a problem if i want to completely void any visible hardware, which is where the push latches come into play.

I can carry the hood myself easy but its awkward and bad on the back due to its size and dimension. Its gotto weigh around 50 lbs though. Ill put it on a scale later and see. Real curious on that because recently we ran into problems with figuring out cabinet weights for shipping.
 

tosiek

Senior Member
Rating - 100%
48   0   0
Almost final tank =0) Im happy. :tub:

IMG_1285.jpg


IMG_1288.jpg


Still have a few tweaks on the hood and finishing touch ups. but for the most part the tanks done besides the finish and veneer on the tank rims. The tank is at 81 1/2" high. =0)

My now major complication, when i ordered the glass it was to be cut the bottom was to be drilled for 2 x 1.5" overflows and a return, then sent over to be mitered and the bottom pane tempered. They forgot to make me the return hole and the tempering was lost in translation at the tempering place, and now i have 5 pieces of tempered glass, 3 of them starfire and a missing return hole which i can't add in any way to the tank without remaking a piece of glass. And to top it all off when they tempered all the pieces they had dust in their oven/kiln. If anyone has done any laquering or high gloss paint finishing in a dusty room you will know what the surface looks like. Which i could have delt with but the front pane is also wavy due to the tempering process (it only happened on the starfire pieces), distorting the view plane through the front piece of glass just enough to make me want to get a new front panel remade since im putting so much into the tank. The sides i can deal with but will end up getting a new non tempered front pane which i will have to wait for a few days.

Now to fix the lack of a return, i have to either remake the bottom pane, make a new rear panel (which was also tempered) to pipe/drill a return into the tank, or deal with only 1 drain and try to work around the extra 1.5" drain hole and convert it to a 1" return.

IMG_1291.jpg


I actually like the mistake and would block off the area from water where the second 1.5" bulkhead hole is and snake the return through and into the tank. This allows me to not block off the back wall 6 1/2" completely across the whole tank, but cut it short roughly 20" from the right side of the tank and cut it back to the back wall. But i can do the same, keep the 2 drains and remake the back panel non tempered and drill a return on the back pane of glass. This is a good thing in a way because i just realized how extremely narrow that end of the tank is, and i gain a 20" x 6 1/2" area to play with which felt crammed the other way. I would have to build out a glass box over the return hole as to keep it dry, acrylic to glass doesn't work too well. The rest of the back box would be 2x 1/4" acrylic laminated with some support spacers to keep it from bowing in across 40" of acrylic covering the overflow. Or laminate the acrylic to a piece of 1/4" glass and run that across for a more stable overflow box, but thats not needed because the water inside the overflow box will balance out the pressure from inside the tank.

tankassemgood.jpg


tankassemgood2.jpg


Again any thoughts or recommendations are welcome. And thanks for all the great comments =0) :birthday:
 
Last edited:

cali_reef

Fish and Coral Killer
Rating - 97.3%
36   1   0
Wavy viewing panes would suck, they won't make you new ones since they screwed up?

How about using the second 1.5 inch hole as a back up drain with a 3/4 vinyl tubing coming up inside of it as your return? I have seen pictures of setups like that on RC, never tried it my self.
 

jhale

ReefsMagazine!
Location
G.V NYC
Rating - 100%
52   0   0
the stand looks awesome, I love the SOSS hinges.

Sorry about the glass, that's a pain. Drilling a return into the back is cool as long as you keep it high enough :lol:
 

jhale

ReefsMagazine!
Location
G.V NYC
Rating - 100%
52   0   0
How about using the second 1.5 inch hole as a back up drain with a 3/4 vinyl tubing coming up inside of it as your return? I have seen pictures of setups like that on RC, never tried it my self.

I like that idea a lot, I've seen it on some Japanese tanks also.
Not sure if the 3/4" is enough for the return though.
 

tosiek

Senior Member
Rating - 100%
48   0   0
After a long and grueling wait time to get all this done the tank was finally siliconed together last night. :biggrinpa:champagne:beer::bunnies::party: The front tempered pane of glass was replaced to a non tempered new piece so now im happy with it all. The finish on the paneling is about a week away from beeing finished which is fine because the tank has to set for a week to a week and a half. I still have to add the overflow and a box for the return as i have to fix the problem with the return hole beeing set at 1 1/2 and im running 3/4 PVC through it but thats all quick stuff and should be fine by tommorrow. The frag tank was assembled as well as a basic not too fancy sump and both just need to be water checked.

And now the plethora of stuff that needs to be done besides basic tank/stand constructuion:

The next steps im doing now is setting the plumbing and placing an order for all the valves and piping tonight. I have a list and a quick diagram on how im running the return and drain through 3 separate tanks in the system. Working between the pump with a 2" intake and 1.5 return and fitting the gate valves to match pressure while im reducing the return line down to 2x 3/4 return openings was fun. I had to place a controll ball valve after i made my 1.5-1" then 1"-3/4" reductions in the return alone to controll the flow pressure and rate the oversized pump was pushing out. Plus i had to split the drain to go to the frag tank while minimizing the line to 1" from 1.5". I don't want to use filter socks on this system after a month or two in. Its alot of maintenance and if im not changing them out every two days (i get lazy) its adding to my nitrates and P04 in my current tank enough that im noticing it on both tank health and test kits. Id love some feedback on that if anyone is actually reading this and could give a good discussion.

I still have to sit down and work the amount of electrical that needs to be done and where. I have to swap out to GFI outlets in the area the tank is going in. I have two separate lines into the room that are on separate breakers, one of which my computer is hooke up to so it is nice that i won't be overloading one breaker with all the tank stuff as there will be alot.

Im planning on getting a RK2 unit to run lighting timers as i have 3 sets of lights that need to be timed w/ fan cycles. 2 for the actinics and main lights in the display, a set of T5's for the frag tank and im planning on running small PC's for some cheato in the sump sooner or later. Plus a reefkeeper unit helps alot in beeing able to easily shut off pumps and lights without digging around for outlets and plugs with the option of adding probes later on to monitor stuff like PH and calcium/alk without getting test kits out when i want to know. Only thing is i have to calibrate them once a month.

I purchased a booster pump recently due to 32ish PSI coming out of my main line, and i have to run RO tubing to the room for my ATO. I am still in the process of getting a solenoid valve for overflow shut off but im not worried too much about it. The float valve i am running as ATO has kept itself clean and reliable. The only problem im going to run into is pressure in the line as im extending the RO ATO line abiout 15 feet farther away from the sink hookup. Its already at 10-15 feet away currently. Air, water and ice (my current RO unit) said i might see a drop in either quality or membrane usage because of the length of RO tubing from the unit. and amount of pressure thats beeing held in the lines vs the length of tubing.

Ontop of all that i still haven;t thouht about venting for the stand and hood much. I have alot of aluminum and brass grills laying around the shops that i have to look through and size for the stand and hood. Im still contemplating running one on each side of the stand itself. The hood will only need 1 unless i can find a 3" x 24" laying around somewhere. I should be installing 2x 120mm PC fans in the hood itself with 1x 80mm pullin air through the electrical box i made in the hood to cool the plug area (although its not really needed in there) and such although there isn't much need as i can run a return vent pattern through that area easily with the 120's. Ill be running 2x 120mm fans in the stand also. The fans will be boxed in to fit the grill size and provide a channeled path for the fan flow so that they aren't blowing back into the stand or not pulling air through. Think turbine engine mechanics.

As all the work on the main tank was beeing done I also had to build another freshwater tank. The Reef tank is going in the spot my old cichlid tank was and i have to move the cichlid tank elsewhere. I found a nice spot at the armrest of my couch that a tank would fit perfectly and add a nice addition to my living room. Only thing is the dimensions weren't standard tank size. So i had to order some more glass and get a stand made. 18 x 26 x 22 with a rift oak stand and its downgraded from a 56g tall tank which is fine. Going to run a dual bulb flourescent fixture over it and just paint the fixture and FW hood to match the finish on the wood. All built and just waiting on a finish for the stand. Ill get pics up in a day or two when its finished completely.

Anyways, this project is almost finally over after about 8+ months of planning and construction. Ontop of the two tanks its forcing me to dramatically rearrange and clean my apt in a good way so there is alot more thought than just tanks runnign through my head as this whole process is going on.
 

tosiek

Senior Member
Rating - 100%
48   0   0
For anyone interested in construction time so far its coming close to over 100 hours of real work between the construction and finishing process on the tank and stand/hood and im probably undercutting the time spent. The finishing process with the high poly finish comes real close to 30+ hours of work alone to do properly. Ive also spent about 12 hours on the small freshwater tank start to finish between glasswork and stand. 4+ hours or so for the construction of the acrylic sump and frag tank.

I just started looking back on the time i spent and it scared me. The time really adds up and its not even counting time thats goin to be spent installing and doing the transfer then final touch ups and fine tuning of all the components.
 

jhale

ReefsMagazine!
Location
G.V NYC
Rating - 100%
52   0   0
whew that was a lot to read :)

my thoughts on the RO, I had about 20' running to my tank from the sink as part of the ATO system, I never detected a drop in water quality when I tested the top off water or make up water. One thing to think about is that long run of RO tubing. I had the tube actually split at one point. I caught it in time and there was no damage, but it did scare me enough to re-think the RO tube run. I enclosed the RO tube in 1/2 spa-flex to protect the RO tube and to also direct any stray water if the tube was to rupture again.

Time adds up, this project lets people see why custom is worth the cost ;) :)

Rift oak Please :Blurp: :)
 

Sponsor Reefs

We're a FREE website, and we exist because of hobbyists like YOU who help us run this community.

Click here to sponsor $10:


Top