tosiek

Senior Member
Rating - 100%
48   0   0
Descided on starting a future tank upgrade thread and could use some advice/input on the process.

I currently have 2 tanks in my house, my saltwater and my cichlid tank. I'm losing interest in the Cichlid tank but i can't get rid of it for certain reasons. So i've been contemplating joining the two together into a dual tank setup as well as downgrading my cichlid tank to a 30 or 40 gallon.

This allows me to:

1. Free up some space in my living room and leave all my fish stuff to 1 part of my apartment instead of 2.
2. allow me to majorly upgrade my saltwater tank, which i have been planning on anyways (larger, doser, chiller, ect.)
4. allow both tanks to get the same amount of attention, which the cichlid tank has been lacking.
5. able to turn the cichlid tank into a partially planted tank.


I have a max space of 6ft by 3.5-4 ft L shaped area to work in. I can come out from the wall max 24".

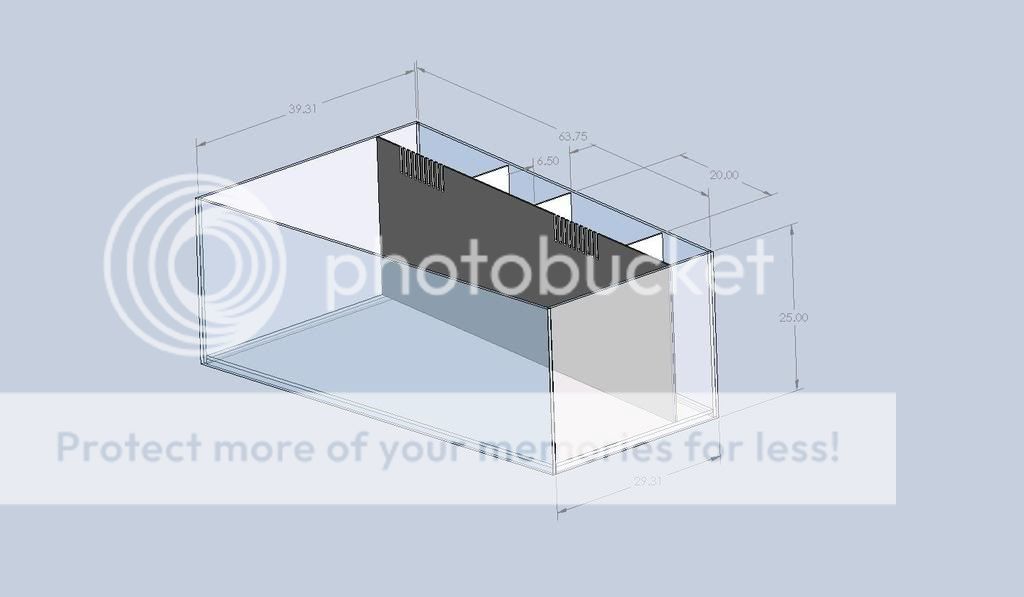
I'll get 3d drawings up soon once solidworks finishes installing but I'm looking into an odd shaped L for the tank with a cut corner on the long part which will be near a door (allows more room to walk in). And was planning on placing the cichlid tank underneath or at the 3 foot area of the L. the only problem is if i put the cichlid tank underneath there is a good chance some Saltwater will fall into it, even if covered and sealed and thats not good for the cichlid fish as it destroys their gills. So, the option of the tank going underneath is out of the question.

Looking on input for design/placement as well as input on a chiller and skimmer as well as working out the flow and lighting. I'm thinking of going creative with this project as far as lighting/flow and will be making everything except for the hardware myself so i have complete control over the whole process. I am also planning on making my own rock (or the majority)to give myself even more control over the way the tank looks. Thinking base rock to support a home made rock sculpture.

As far as lighting goes i was planning on not running MH's + T5 suppliments along the whole of the tank but providing different zones or area's of light quality. Having an area thats SPS high light, running down the tank to an area thats under T5's for LPS then to zoa's.

I dunno. Thats the current plan for now. Once i get some sketch tank shapes up i'll post them and continue from there.

Am i going too overboard with the tank or do you guys think its going to be worth it?
 

masterswimmer

Old School Reefer
Vendor
Location
NY
Rating - 99.6%
448   2   0
Good luck, but too much info and stuff to think about all at once. Just wanted to mention that when I was breeding cichlids I had to add salt to the tank. Granted it was a Tanganyika Cichlid salt mix, but it was salt nevertheless.

I'll add more useful info when you show me the drawings. ;)

swimmer
 
Location
Upper East Side
Rating - 100%
21   0   0
I like the idea of the lighting - it's something I've been sort of struggling with. The one thing that I would worry about is aesthetically to me, it looks weird when the lighting isn't consistent over the whole tank. If you did decide to do different light "areas", I'd suggest making it symmetrical, with high light in the middle, then T5s, then PCs or nothing for the zoas.

I think your idea of the cichlid tank in the short part of the L and the saltwater in the long part is a good one.
 

KathyC

Moderator
Location
Barnum Island
Rating - 100%
200   0   0
I also like the idea of having one tank run into the other and think I might start with the MH at the far end of the SW tank ..then reduce to T5..and even lower over the cichlid tank.
Are you planning on making the rock work look like it continues into the cichlid tank..I think that would look great! I'd match the height where the 2 tanks meet and then lower it toward the end of the cichlid tank.

Like Russ I'd like to see the drawings:)
Whatkind of cichlids do you have Tony?
 

tosiek

Senior Member
Rating - 100%
48   0   0
Sweet. Thanks for the link nano! Only thing that i'm worried about is that in using a foam/epoxy base the rock is more asthetic than beneficial to the natural filtration. So would need to offset that somehow. Was going to go reef ceramic way of doing it. Only problem is finding a kiln.

As for the lighting i didn't even think of that. Gonna make sure i match up the bulb colors correctly.

Kathy: i have a mix of cichlids and don't know the names of them all. And the plan was to have the cichlid tank drop lower than the SW tank. Gives a nice idea for a rock wall and going a deep tank (height wise)

I'll get drawings up tommorrow.
 

tosiek

Senior Member
Rating - 100%
48   0   0
Been playing a little today. Nothing too special. The side to the right (which is near the door) i put tapered in a bit instead of cutting the corner which would suck to look at because of the extra silicone line.

tanksetup2qm1.jpg


the small tank would not be double walled. Just was easier for me to build that way in the program. It would drop 6 inches lower than the top of the first tank. This just shows glass work. Would need to design the cabinet around it. So i'm sure something will change.

Dimensions:

Large tank: (inner dimensions)

78" x 30" at the largest part 18/19" at the shortest x 28" high (about 200 gallons give or take)

Small tank: (inner dimensions)

15" x 20" x 35" high (45 gallons)


yes/no? any input would be great. Was also thinking of putting the small tank underneath and extending the SW into where the small tank is and not dropping it lower. But then the idea of a tall tank is out the window.

Also Started to think about having the glass between the small and large clear, would there be territory issues with certain fish between the glass?
 

tosiek

Senior Member
Rating - 100%
48   0   0
I thought i had alot more room in the short part of the L. But i have 15" + the 30" + glass thickness and thats putting me real close to a window on that side. Thinking of going 24 or so inches for depth from the wall and doing a 90 degree corner but its only going to add 5-6 inches and i would prefer more depth to work with. I dunno.
 

masterswimmer

Old School Reefer
Vendor
Location
NY
Rating - 99.6%
448   2   0
Sorry T, I'm just not feeling it. The 6" drop is wierd. The curved front is just ehhh. The mitered corners on those funky angles is gonna be a tough cut and silicone job.

It just looks like a mish mash of mistakes. It doesn't appear as well laid out as some of your other top notch work. The flow isn't there for me. Sorry bud, JMO. I wouldn't have said anything, but you asked.

swimmer
 

tosiek

Senior Member
Rating - 100%
48   0   0
Starting this back up again =0) I've started planning stages of a new upgrade im planning on completing end of august/september while things should be slowing down for me. Looking for some more imput because 2+ heads are better than one. :tongueani

Im throwing out the 2 display idea out and the L shaped pattern. I am going to keep the slanted front panel just because i run out of space to get a 30ish inch depth front to back that i want near the door. I think it will be a really interesting aquascape area if i keep it. Rectangles are getting boring =0) time to spice it up.

Ill get drawings of the room and the tank placement in a few days to give an idea but for tank dimentions i was looking at a 5-6 foot tank with 20-23" on the door side and 30-34" (i can go a max of 39") on the other side going up against a wall. I had a sample made of a mitered edge and its perfect =0) Now i have two options, make the tank a full 6foot and squeeze 20 inches on one side or drop it back to 5 foot and get a 24" depth front/back on one side. I lose water volume and a foot of tank space but i also lose about ~300lbs. 6 foot tank comes out to about 190g and the 5foot is about 160 ish. Water height will be 23 inches.

I added a frag tank to my current set up to hold some coral before placing it permenantly into my tank and wanted to add that to my new tank somehow without having a separate tank next to it. So i was planning on adding one directly under my display in my stand, but above a sump/fuge. a 4x2x4-6" acrylic tank under the tank on a shelf which would be above the sump. Probably go with a sump/fuge of about 40 ish gallons. And they would be linked in a donkey kong style drain system if that makes sense. The display would drain into the frag tank and then into the sump and back into the display, alternating right/left for the supply/return for each tank. I just dunno if to add the fuge before the sump or after. Only problem i see is making room between the sandwich of tanks to fit a skimmer =( I haven;t done the math for the stand height ect.

Im also playing with wood/material to make the stand in. Im planning on teak for the wood finish, both solid and veneered ply, and adding brass with the hinges, knobs, and some rectangular bars mitered into the paneling/sides ect. I want that old ship deck look. Im still browsing through designs and other work done in teak. We did some work with these old brass portholes and accented ceiling panels that i really liked with 1/4" brass inset pieces and i would like to transfer that look somehow. Im also trying to fit in some illuminated white lamminate frosted glass panels into the hood somehow. My original idea was to machine out the majority of the hood in brass with glass but tieing it into the rest of the cabinetry just didn;t work as well as i planned. Also it would mean a few days in front of a milling machine and i don't want to do that.

Anyways, ill get pics and sketches scanned over the next few weeks and progress as its beeing done. Any input is greatly appreciated =0)
 

tosiek

Senior Member
Rating - 100%
48   0   0
Quick update on the tank. I just put the tank into production today. Ordered glass and started to build the stand. I have a quick cad 3d view of the glass part of the tank.

Quick updates on materials/equipment/setup:

Tank will be 3 sides starfire half inch 34x24x66 or so and 23 for my water line inside the tank. Plexi backing with routed overflows. Tank comes out to 190g. Tank will have an oak rim across the bottom to support the base and top to accept a hood and the oak will be veneered in ebony.

Stand will be ply construction (overbuilt) with a shelf to accept a 28-30x18x6 high frag tank. Still working on sump plans but it will be around 30 gallons with a fuge. I have just enough macassar ebony to put a finish on the stand because of a screw up (not me). Its nice, a mix between quartered and rift cut with purples in the grain.

The whole system is going to be powered by a Reeflo Snapper return pump run on a valve to lower the pump a bit. Bubble king mini 200 which i am scared might be a little underpowered but it should be fine. I won't be overskimming but i don't plan on keeping alot of SPS anyways. I will also be using my vortek with a second planned in a few months. For now my budget is stuck on a maxi mod or something for the time beeing.

As for lighting i was thinking of two lumenarc 3's SE with a nice white/blue bulb, and i will be supplimenting with either T5 or VHO retro's. Can't descide yet. So far my vision is to only light two area's of the tank with blinding SPS MH light. I feel low light area's are great and give a nice transfer to a mixed reef instead of having all the LPS blasted with Mh light or hiding under rocks. Gives a good horizontal progression across the tank instead of the typical vertical setup everyone runs of SPS on top then LPS then softies/zoa's.

Anyways thats where i am at right now. Still redoing my plumbing plans and working details for the sump and the canopy design. I still have to fit in a switch box in the canopy as well as ventilation for the whole thing.

If anyone knows of any switch boxes for blugs thats commercially available instead of DIY would be great. Any comments on things is appreciated. not much is bought at the moment. I planned on getting the lights and skimmer this week.


Here is a quick 3D view i was working on for the glass part of it (only thing digital i have). Its going to be a few more days while i fix up some scaled drawings i made by hand to sketch on for the bottom stand to work out dimensions. And ive been real lazy setting up my scanner. Still need to work out the details on the canopy but that can wait till later.

tankassemgood.jpg


I ran into stress problems with the external overflows and the cutouts needed for them (would have to temper the back pane of glass) and descided it would be easier for me to extend the back of the tank and block it off. It provides me with easy sleeping, a clean black background that will be covered in coraline quick, able to get to the bulkheads from under (inside) the cabinet and eliminates internal overflows while controlling my gallonage. With the top piece of rim i should be real close to 22-23" for the top of the water which i am shooting for.

I was planning on 2 overflows at 1 1/4" or maybe 1". Still haven't descided but need to decide today or tommorrow before my glass starts getting cut.

Any input is appreciated. I know im missing things and it helps to have a few more sets of eyes looking at it all.
 

masterswimmer

Old School Reefer
Vendor
Location
NY
Rating - 99.6%
448   2   0
Hey T, looks like the plan is finally coming to fruition. Congrats, I know it's a major leap taking that first step.

What are the two chambers for in the back that don't have the overflow teeth cut into them?

I would do two 1.5" overflows in a 190g. I think you can quiet the overflows more with a larger diameter overflow, even if you don't utilize it for maximum flow.

swimmer
 

tosiek

Senior Member
Rating - 100%
48   0   0
The back two boxes are just to lessen the gallonage and will be empty. If i fill that whole space completely it comes out to about 40g + of water extra. I minimized it to 2x 10g. the same as i would have done with an external, giving me enough water to make the overflows work correctly. Otherwise I would have to cut out a U shaped pattern where the overflow teeth are in the glass and i can't get a chip free job. Plus it creates a different stress on the back pane of glass with the cutouts + the hanging overflows with 10g of water, and at 5 1/2 feet im playing it safe.

Hope that helps.
 

KathyC

Moderator
Location
Barnum Island
Rating - 100%
200   0   0
Love the look of the new tank Tony! Also think your ideas about the lighting are a novel concept and will definitely allow you to get rid of that linear look most of us live with.

No good input for ya, but I'll be here cheering you on :thrash:
 

cali_reef

Fish and Coral Killer
Rating - 97.3%
36   1   0
How about algae chambers for the two empty boxes?

Two Luminarc 3's with 250W will be planty to keep the entire tank lit.

FWIW, frag tanks under the stand will limit your ability to keep a CO2 tank and CaRx in there. Heat from the frag tank contained in the closed stand will be another issue to consider.

Lets see the fancy wood!!
 

Sponsor Reefs

We're a FREE website, and we exist because of hobbyists like YOU who help us run this community.

Click here to sponsor $10:


Top